Troubleshooting-Gaggia-Evolution-Head-Leak
From Whole Latte Love Support Library
From Top Of Machine
A leak from the top (or head) of the machine typically indicates a loose connection or broken part inside the machine. If the leaking is coming from between the portafilter and the grouphead then refer to the section of this article which covers changing the group gasket. Otherwise follow these steps to identify the source of the leak. It may be necessary to run the machine with the top removed in order to identify the leak.
- Turn the machine off and unplug it.
- Open the top of the machine. Check for any loose hoses, broken hoses or hoses with pinhole leaks, or any other fittings that are leaking.
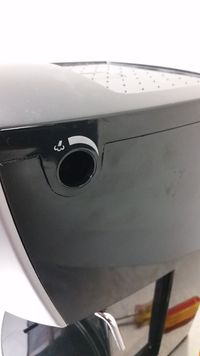
- To open the top first remove the steam knob by pulling it off. The machine will look like this once the knob is removed:
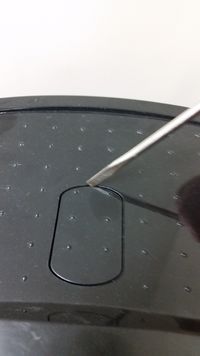
- Next you will need to remove the screw hole cover on the top of the machine. There is a small slit in the back of the cover where you can insert a flathead screwdriver and pry the cover out.
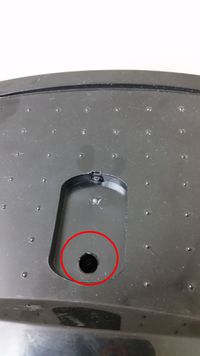
- Once the cover is removed you will be able to access the screw that holds the top cover on. It is located in a hole on the top of the machine.
- Once the screw is removed the top will simply lift straight up and off.
- If you find a loose hose reconnect it to the appropriate fitting.
- Hoses that are broken or have pinhole leaks will need to be replaced.
- Other loose fittings can typically be resecured by screwing the part down. Plumbers tape or a sealing compound may be necessary to provide a good seal.
- Check the pump connections to make they are secure.
- Examine the pump to see if there are any cracks in it. If the machine was exposed to subfreezing conditions without being properly drained it can cause the pump to crack. Replace the pump if it is cracked.
- Make sure both the inlet line and the outlet line on the pump are securely connected. Check the brass elbow connection on the pressure side of the pump. If there is leaking coming from this elbow joint then it will need to be resecured. Apply a foodsafe sealing compound to the threading of the elbow and screw it back into the pump. Let the compound cure for 24 hours and the leak should be gone.
- Examine the boiler assembly.
- If there is leaking coming from between the boiler and the grouphead there are two possible causes.
- If there is leaking all around the edge where these assemblies meet they are not sealing properly.
- First try tightening the eight allen screws that secure the boiler and grouphead together. There are four allen screws at the bottom of the boiler assembly inside the machine, and the other four bolts are located externally beneath the head of the machine.
- If it continues to leak then the o-ring that seals these two assemblies has slipped out of place or is worn out and needs to be replaced. Try unscrewing the boiler and the grouphead by removing the eight allen screws mentioned in the previous steps. Clean the o-ring off and reseat it and screw the boiler assembly back into place.
- If this does not resolve the leak then the o-ring is worn out and needs to be replaced. Replacement o-rings can be purchased here.
- If the leaking is mainly coming from the side of the boiler that faces the front of the machine then the boiler is probably cracked. This will happen if the machine is exposed to subfreezing temperatures without being drain properly, or the machine is dropped. The boiler will need to be replaced.
- If there is leaking all around the edge where these assemblies meet they are not sealing properly.
- If you find a crack anywhere else on the boiler then the machine was exposed to subfreezing temperatures without being drained properly or the machine was dropped. The boiler will need to be replaced.
- If there is leaking coming from between the boiler and the grouphead there are two possible causes.


