|
|
| (17 intermediate revisions by 5 users not shown) |
| Line 1: |
Line 1: |
| − | The Expobar Office Lever is a [[:Category:Prosumer|Prosumer]] espresso machine which features an E-61 style grouphead. {{Description-Table
| + | {{Getting-Started |
| − | |title = Expobar Office Lever | + | |brand = Expobar |
| − | |machine_image = [[File:EXPOBAR_OFFICE_LEVER.gif|none]] | + | |machine_type = Prosumers |
| − | |manufacturer = [[:Category:Expobar|Expobar]] | + | |product_banner = [[File:Wiki_ProductPageBanner_1200x175_ExpobarOfficeLever_v1.jpg]] |
| − | |model_name = Office Lever | + | |product_page_title = Expobar Office Lever |
| − | |type = [[:Category:Prosumers|Prosumer]] | + | |page_type = set up |
| | + | |section1 = Install It |
| | + | |anchor1 = Install |
| | + | |section2 = Get it Good & Hot |
| | + | |anchor2 = Heating |
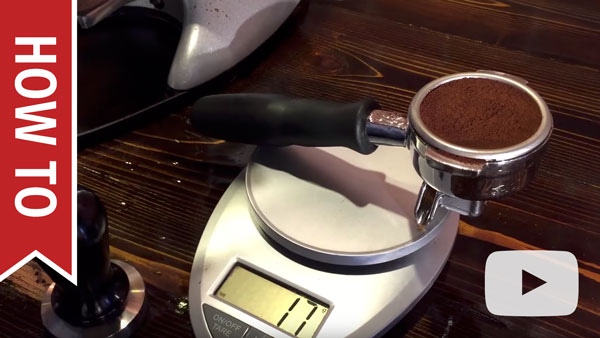
| | + | |section3 = Get a Handle on your Tamp |
| | + | |anchor3 = Tamping |
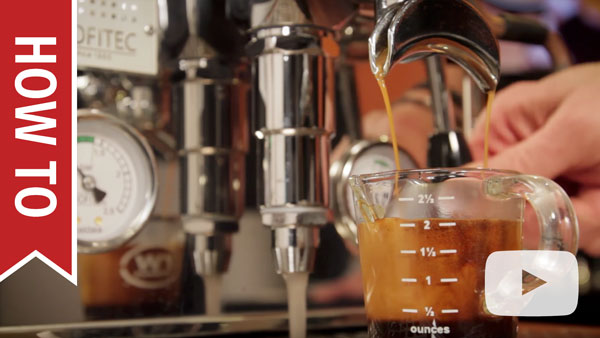
| | + | |section4 = Brew Better |
| | + | |anchor4 = Brew Better |
| | + | |section5 = Brew the Best You Can Brew |
| | + | |anchor5 = Brew Best |
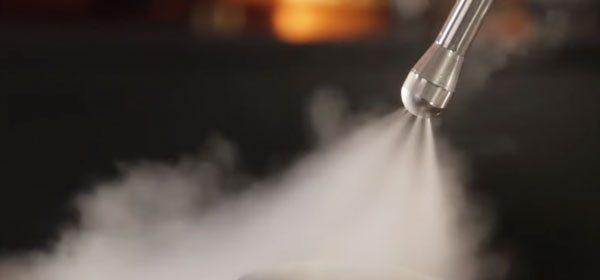
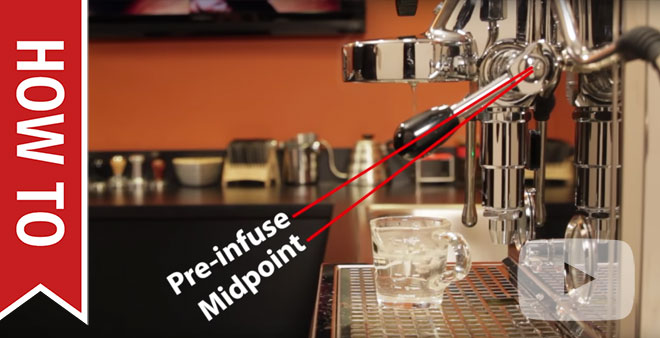
| | + | |section6 = Preinfusion and You |
| | + | |anchor6 = Preinfusion |
| | + | |section7 = Get Frothing |
| | + | |anchor7 = Get Frothing |
| | + | |section8 = Froth Better |
| | + | |anchor8 = Froth Better |
| | + | |section9 = Frothing and Habits to Avoid |
| | + | |anchor9 = Frothing Mistakes |
| | + | |section10 = Steam & the Heating Sweet Spot |
| | + | |anchor10 = Steaming Temperature |
| | + | |section11 = Steam with Thermometers |
| | + | |anchor11 = Steam with Thermometers |
| | }} | | }} |
| − | | + | {{Set-Up-Content |
| − | == Machine Description ==
| + | |dual_boiler = |
| − | | + | |
| − | The Expobar Office Lever is a single boiler prosumer espresso machine equipped with a vibration pump. The machine is perfect for casual commercial use or home use. As with all Expobar machines, the Expobar Office Lever comes with a chrome-plated brass E-61 brew group that has been proven to excel at maintaining stable brewing temperature. The machine also features a commercial style steam wand assembly. The Office Lever is outfitted with a heat exchange boiler that utilizes a 1250-watt heating element. It has a body made of heavy-gauge polished stainless steel. It features a passive cup warmer and a large drip tray. The Expobar Office Lever has a large 90oz reservoir with an optional water softener. The water tank can be removed for hassle-free refilling and maintenance. The current version of the Office Lever features both a brew and a steam gauge, while older models will only have a steam gauge. The machine is also available in a Plus version which features the option to plumb.
| + | |
| − | | + | |
| − | ==Basic Usage==
| + | |
| − | | + | |
| − | ===Getting Started===
| + | |
| − | | + | |
| − | {{#ev:youtube|https://www.youtube.com/watch?v=v1ahEkNzm_c|480|center}} | + | |
| − | | + | |
| − | ===Adjusting Brew Pressure===
| + | |
| − | | + | |
| − | {{#ev:youtube|https://www.youtube.com/watch?v=torXYzDE2y0|480|center}}
| + | |
| − | | + | |
| − | ===Draining The Boiler===
| + | |
| − | | + | |
| − | {{#ev:youtube|https://www.youtube.com/watch?v=ln25nJbyQQc|480|center}}
| + | |
| − | | + | |
| − | ===Pre-Infusing===
| + | |
| − | | + | |
| − | This machine utilizes the same group style as an [[Expobar Brewtus IV]], so the same pre-infusion procedure can be applied.
| + | |
| − | | + | |
| − | {{#ev:youtube|https://www.youtube.com/watch?v=zKDvJUxrXDo|480|center}}
| + | |
| − | | + | |
| − | ===Reading The Brew Gauge===
| + | |
| − | | + | |
| − | The brew pressure gauge is only meaningful when the machine is actively brewing. While the machine is standing by the gauge may move around, sit at zero, or show the the circuit is pressurized; this does not mean anything. This gauge is only accurate while the brew circuit is activated during brewing. A simple test of the machine's brew pressure can be completed by using the backflush disc.
| + | |
| − | #Insert the backflush disc into the portafilter and attach it to the machine.
| + | |
| − | #Activate the brew function. The gauge will fall to zero, and then begin pressurizing.
| + | |
| − | #After about 10-15 seconds the pressure should read 8-11 Bar pressure. If your machine does this then there is nothing wrong with the brew function or brew gauge, the machine is operating to spec.
| + | |
| − | | + | |
| − | | + | |
| − | == Cleaning & Maintenance ==
| + | |
| − | | + | |
| − | {{Maintenance-Prosumer
| + | |
| − | |single_heat_exchange = Yes
| + | |
| − | |group_gasket_instr = The gasket can be purchased [https://www.wholelattelove.com/products/group-gasket-for-office-lever-and-brewtus-8-5mm here]. Instructions for replacing the gasket can be found below:[[File:EXPOBAR BREWTUS & LEVER Gasket Changing.pdf|250px|thumbnail|center|Group Gasket Changing Instructions]]
| + | |
| − | |descaling_products = The machine can be descaled using [https://www.wholelattelove.com/products/urnex-full-circle-descaling-liquid Urnex Full Circle Cleaning Liquid].
| + | |
| − | |softener_info = This machine has a water softener cartridge available. The water softener should be replaced every 3 months. To make the water softener more effective it should be recharged on a monthly basis. The following document explains how to recharge the water softener: [[File:EXPOBAR ALL Recharging Water Softener.pdf|250px|thumbnail|center|Water Softener Recharging Instructions]] Replacement water softeners can be purchased [https://www.wholelattelove.com/products/expobar-water-softener-cartridge here].
| + | |
| | }} | | }} |
| − |
| |
| − | == Troubleshooting ==
| |
| − |
| |
| − | ===No Crema or Bad Tasting Shots===
| |
| − |
| |
| − | {{Troubleshooting-No-Crema-Bad-Shots}}
| |
| − |
| |
| − |
| |
| − | ===Difficulty Frothing===
| |
| − |
| |
| − | {{Troubleshooting-Frothing}}
| |
| − |
| |
| − |
| |
| − | ===Flow Issues===
| |
| − |
| |
| − | The first place to start with any flow issue is cleaning the machine. Before going through these steps please make sure the machine is cleaned according to the [[#Cleaning & Maintenance|Cleaning & Maintenance]] section of this article.
| |
| − |
| |
| − | {{Troubleshooting-Prosumer-No-Steam
| |
| − | |steam_gauge = Yes
| |
| − | |vacuum_relief_instr = Instructions for cleaning the vacuum relief valve can be found in the video below: {{#ev:youtube|https://www.youtube.com/watch?v=ecR9nDsORd8|480|center}}
| |
| − | |hls_reset_instr = Instructions for resetting the high limit switch can be found in this document:[[File:EXPOBAR BREWTUS IV High Limit Reset.pdf|250px|thumbnail|center|High Limit Switch Reset Instructions]]
| |
| − | |pstat_picture = [[File:EXPOBAR OFFICE LEVER 2-Wire Pressurestat.gif|200px|super|thumbnail|right|2-Wire Pressurestat]]
| |
| − | |pstat_adjust_instr = Instructions for adjusting the pressurestat can be found in the document below:[[File:EXPOBAR OFFICE LEVER 2-Wire Pressurestat Adjustment.pdf|250px|thumbnail|center|2-Wire Pressurestat Adjustment Instructions]]
| |
| − | |pstat_rep_instr = There are two versions of the pressurestat for this machine. The original version is a 2-Wire pressurestat, which is available for purchase [https://www.wholelattelove.com/products/2-wire-pressurestat-ceme-wide-band here]. Some Lever machines have been updated to utilize the newer 3-Wire pressurestat, which can be purchased [https://www.wholelattelove.com/products/3-wire-pressurestat-d1-15-narrow-band here]. If you have the 3-wire style, or plan to convert to the three wire style the wires will need to be attached in a certain way. The picture below shows which terminals the wires need to attach to: [[File:EXPOBAR OFFICE LEVER Pressurestat Conversion.jpg|200px|thumbnail|center|The wires should be attached to the terminals indicated by the red arrows.]]
| |
| − | }}
| |
| − |
| |
| − | {{Troubleshooting-Prosumer-Brew-Blocked
| |
| − | |grouphead_instr = Instructions for taking the grouphead apart for cleaning can be found below:[[File:EXPOBAR BREWTUS IV Backflush & Group Clean.pdf|250px|thumbnail|center|Backflushing & Grouphead Cleaning Instructions]]
| |
| − | |backflush_instr = Backflushing instructions can be found in the tech document from the previous step.
| |
| − | |valve_instr = Instructions for taking the OPV assembly apart for cleaning can be found here:[[File:EXPOBAR BREWTUS IV OPV Valve Repair.pdf|250px|thumbnail|center|OPV Clean & Repair]] If the machine continues to have flow issues after cleaning this assembly then it may need to be replaced. Replacement of the entire pump/OPV/deairator assembly is suggested if this is the case.
| |
| − | }}
| |
| − |
| |
| − | {{Troubleshooting-Prosumer-No-Hot-Water
| |
| − | |steam_gauge = Yes
| |
| − | |vacuum_relief_instr = Instructions for cleaning the vacuum relief valve can be found in the video below: {{#ev:youtube|https://www.youtube.com/watch?v=ecR9nDsORd8|480|center}}
| |
| − | |hls_reset_instr = Instructions for resetting the high limit switch can be found in this document:[[File:EXPOBAR BREWTUS IV High Limit Reset.pdf|250px|thumbnail|center|High Limit Switch Reset Instructions]]
| |
| − | |pstat_picture = [[File:EXPOBAR OFFICE LEVER 2-Wire Pressurestat.gif|200px|super|thumbnail|right|2-Wire Pressurestat]]
| |
| − | |pstat_adjust_instr = Instructions for adjusting the pressurestat can be found in the document below:[[File:EXPOBAR OFFICE LEVER 2-Wire Pressurestat Adjustment.pdf|250px|thumbnail|center|2-Wire Pressurestat Adjustment Instructions]]
| |
| − | |pstat_rep_instr = There are two versions of the pressurestat for this machine. The original version is a 2-Wire pressurestat, which is available for purchase [https://www.wholelattelove.com/products/2-wire-pressurestat-ceme-wide-band here]. Some Lever machines have been updated to utilize the newer 3-Wire pressurestat, which can be purchased [https://www.wholelattelove.com/products/3-wire-pressurestat-d1-15-narrow-band here]. If you have the 3-wire style, or plan to convert to the three wire style the wires will need to be attached in a certain way. The picture below shows which terminals the wires need to attach to: [[File:EXPOBAR OFFICE LEVER Pressurestat Conversion.jpg|200px|thumbnail|center|The wires should be attached to the terminals indicated by the red arrows.]]
| |
| − | }}
| |
| − |
| |
| − | ====No Flow At All====
| |
| − |
| |
| − | {{Troubleshooting-Prosumer-No-Flow-At-All
| |
| − | |water_supply = Reservoir
| |
| − | |sensor_instr = The water tank sensor may be wired incorrectly. This video below will explain how to rewire the sensor correctly: {{#ev:youtube|https://www.youtube.com/watch?v=UIiLeRdVWAU|480|center|||start=61}}
| |
| − | |pump_instr = This video will explain how to test for electrical pump issues:{{#ev:youtube|https://www.youtube.com/watch?v=UIiLeRdVWAU|480|center|||start=961}}
| |
| − | |valve_instr = Check to make sure the fill valve is operational. This video will explain how to see if the fill valve is activating properly:{{#ev:youtube|https://www.youtube.com/watch?v=UIiLeRdVWAU|480|center|||start=1088}}
| |
| − | }}
| |
| − |
| |
| − | ===Machine Is Leaking===
| |
| − |
| |
| − | {{Troubleshooting-Prosumer-Bad-Gasket
| |
| − | |gasket_instr = Instructions for changing the gasket can be found here: [[File:EXPOBAR BREWTUS & LEVER Gasket Changing.pdf|250px|thumbnail|center|Group Gasket Changing Instructions]] A replacement group gasket can be purchased [https://www.wholelattelove.com/products/group-gasket-for-office-lever-and-brewtus-8-5mm here].
| |
| − | }}
| |
| − |
| |
| − | {{Troubleshooting-Prosumer-E61-Leak
| |
| − | |lever_style = Lever
| |
| − | |lever_leak_instr = A blowout of the lever assembly can be seen on p.13 of the machine's parts diagram. The o-rings that will need to be checked are listed as part 9 and part 8 on this page.
| |
| − | ###To access these o-rings remove the end cap of the lever assembly using a flathead screwdriver.
| |
| − | ###Once this is removed the other components of the grouphead assembly can begin to be slipped off. The bolts that the lever slides into can be removed with open ended wrenches or an adjustable wrench.
| |
| − | ###Inspect the o-rings and make sure they are not damaged. It's possible that they are just dirty and need to be cleaned off and reseated. If they are damaged, broken, or shows signs of chaffing then they will need to be replaced.
| |
| − | ###Inspect the valve components well to make sure they are intact.
| |
| − | ###Reassemble the components and see if leaking is resolved.
| |
| − | |top_valve_leak_instr = A blowout of the top valve assembly, known as the mushroom or trumpet valve, can be found on p.13 of the machine's parts diagram. There are a few components which can be contributing to the leaking. There are two o-rings, listed as parts 1 and 4 on this page of the diagram. There is also a valve assembly shown as assembly 6 on the same page.
| |
| − | ###To access these parts use an open ended wrench or adjustable wrench to remove the smaller top bolt of the E-61. This will give you access to the first o-ring and spring assembly.
| |
| − | ###To access further down into this part of the grouphead use a wrench to remove the large bolt. This will let you access the other o-ring, another spring assembly, and the other valve assembly.
| |
| − | ###Inspect all of these components for integrity. Clean any dirty parts and replace any broken parts.
| |
| − | ###Reassemble the grouphead and see if the leaking is resolved.
| |
| − | |bottom_valve_leak_instr = A blowout of the bottom valve assembly, known as the release valve, can be found on p.13 of the machine's parts diagram. There are two o-rings in this assembly, listed as parts 4 and 14 on the diagram, and two valve assemblies, listed as assemblies 10 and 12 on the diagram, that can be causing the leak.
| |
| − | ###To access these parts use an open ended wrench or adjustable wrench to remove the smaller bottom bolt. You will be able to access part 14, the o-ring, and assembly 12, one of the valve assemblies. Inspect the parts. If they are dirty clean them off, if they are broken replace them.
| |
| − | ###To access the next o-ring and valve assembly use a wrench to remove the larger of the bolts. Again, inspect the parts for cleanliness and damage. Clean or replace as needed.
| |
| − | ###Reassemble the release valve and test to see if the leaking is resolved.
| |
| − | |E61_group_cleaning_instr = Instructions for cleaning the entire E-61 can be found by clicking [http://coffeetimex.wikidot.com/e61-group-servicing here].
| |
| − | |E61_attach_instr = There are two possible reasons for the machine to be leaking from here.
| |
| − | ##The first is that one of the plumb lines connected to the back of the E-61 is not secure resulting in a leak. This will need to be tightened from the inside of the machine. You may see leaking from the bottom of the machine as well if this is the case. Remove the top of the machine and look towards the front of the machine. These lines will be located on the back of the faceplate, opposite to where the grouphead is seated. They are listed as parts 19 and 11 on p.9 of the machine's parts diagram. Use an open ended wrench or adjustable wrench to tighten these down. If the leaking persists you may need to apply white teflon plumbers tape or a sealing compound such as food safe permabond.
| |
| − | ##The other possibility is that the E-61 group chassis gasket is not sealing tightly, or is worn out or damaged and will need to be replaced. The chassis gasket is listed as part 20 on p.13 of the parts diagram. There are two bolts which secure the E-61 to the machine chassis, causing it to press on the gasket and create a seal. First try tightening these two bolts down.[[File:EXPOBAR BREWTUS IV Securing Bolts.JPG|480px|thumbnail|center|E-61 Securing Bolts]] If tightening these bolts does not resolve the leak, then the chassis gasket will need to be replaced.
| |
| − | }}
| |
| − |
| |
| − | {{Troubleshooting-Prosumer-Bottom-Leak
| |
| − | |water_source = Reservoir
| |
| − | |tube_reservoir = Yes
| |
| − | |level_probe_instr = The water level probe can be cleaned by removing it from the boiler. First make sure the machine is unplugged and fully cooled off. The probe is listed as part 7 on p.16 of the machine's parts diagram.
| |
| − | ####The probe is secured to the boiler by a bolt. Use an open ended wrench or adjustable wrench to remove the probe. Newer versions of the machine will have a two bolt assembly. Remove the smaller upper bolt to access the probe.
| |
| − | ####Once the probe is removed clean it off. Soak the probe in a solution of hot water and backflushing powder.
| |
| − | ####If the probe has a large amount of scale buildup on it a scrubby sponge can be used to remove the scale buildup. Do not use a metal scrubber as it can damage the probe.
| |
| − | ####Also examine the wiring of the probe to make sure it is intact and is attached to the power board of the machine.
| |
| − | }}
| |
| − |
| |
| − | {{Troubleshooting-Prosumer-Top-Steaming
| |
| − | |vacuum_cleaning_instr = {{#ev:youtube|https://www.youtube.com/watch?v=ecR9nDsORd8&ab_channel=WholeLatteLove|480|center}}
| |
| − | |vacuum_replace_link = A replacement vacuum relief can be purchased [https://www.wholelattelove.com/products/vacuum-relief-valve-rubber-seal here]
| |
| − | |steam_adjust_style = Gauge
| |
| − | |pstat_adjust_instr = Instructions for adjusting the pressurestat can be found in the document below:[[File:EXPOBAR OFFICE LEVER 2-Wire Pressurestat Adjustment.pdf|250px|thumbnail|center|2-Wire Pressurestat Adjustment Instructions]] There are two versions of the pressurestat for this machine. The original version is a 2-Wire pressurestat, which is available for purchase [https://www.wholelattelove.com/products/2-wire-pressurestat-ceme-wide-band here]. Some Lever machines have been updated to utilize the newer 3-Wire pressurestat, which can be purchased [https://www.wholelattelove.com/products/3-wire-pressurestat-d1-15-narrow-band here]. If you have the 3-wire style, or plan to convert to the three wire style the wires will need to be attached in a certain way. The picture below shows which terminals the wires need to attach to: [[File:EXPOBAR OFFICE LEVER Pressurestat Conversion.jpg|200px|thumbnail|center|The wires should be attached to the terminals indicated by the red arrows.]]
| |
| − | |relief_stuck_instr = The pressure relief valve is listed as part 6 on p.11 of the machine's parts diagram. Make sure the machine is turned off and cooled down. Then use an open ended wrench or adjustable wrench to unscrew this part from the boiler. Soak the valve in a solution of hot water and backflushing powder, and use a grouphead cleaning brush to remove any major scale deposits on the part.
| |
| − | }}
| |
| − |
| |
| − | {{Troubleshooting-Prosumer-Wand-Leak
| |
| − | |knob_instr = The knob assembly is simple to take apart. A blowout of this assembly can be seen on p.15 of the machine's parts diagram.
| |
| − | ###Simply use a screwdriver to remove the screw on the knob assembly.
| |
| − | ###Once this screw is removed then the knob will come off. Pull forward on the knob and it will slide off the steam valve cam shaft.
| |
| − | ###Inspect both the screw and the knob to make sure they are not damaged or stripped. The knob should have a square shaped hole that matches the shape of the cam shaft. If this hole gets misshapen from over-tightening the steam or hot water knobs, it will spin on the shaft instead of closing it.
| |
| − | ###While these parts are removed test to see if you can stop the leaking by manually tightening the cam shaft. A pair of pliers are adjustable wrench will provide sufficient grip to turn the shaft manually.
| |
| − | |descalable = Yes
| |
| − | |tip_instr = <br />
| |
| − | ##The steam tip o-ring is easy to access. Simply remove the steam tip and there will be a small o-ring between the tip the wand arm. Inspect this o-ring for damage and clean it.
| |
| − | ##The hot water tip is a little more complicated, but still easily accessed and cleaned.
| |
| − | ###First unscrew the entire tip assembly from the wand arm. [[File:EXPOBAR BREWTUS IV Hot Water Tip Removed.jpg|200px|thumbnail|center|Hot Water With Tip Removed]]
| |
| − | ###There will be an o-ring between the tip assembly and the wand arm. If the leaking was coming from here, then this o-ring needs to be cleaned and repositioned, or if it is damaged it will need to be replaced. [[File:EXPOBAR BREWTUS IV Hot Water O-ring.jpg|200px|thumbnail|center|The red arrow points to the described o-ring]]
| |
| − | ###If the leaking was coming from farther down on the tip, then the tip will need to be disassembled further to troubleshoot. To disassemble the tip further simply twist the two halves of the tip assembly in opposite directions. [[File:EXPOBAR BREWTUS IV Hot Water Tip Disassembly.jpg|400px|thumbnail|center|Twist in the direction of the arrows shown.]]
| |
| − | ###Once the tip is apart it will separate into four separate pieces. There will be three metal pieces and another o-ring. Inspect the o-ring for cleanliness and damage. The metal pieces can be soaked in a solution of hot water and backflushing powder to remove and scale buildup on them. [[File:EXPOBAR BREWTUS IV Hot Water Tip Blowout.jpg|400px|thumbnail|center|The disassembled hot water tip.]]
| |
| − | |ball_joint_instr = <br />
| |
| − | ##These instructions apply to both the steam and hot water wands. First remove the wand arm. This can be done by unscrewing the hex shaped bolt at the top of the arm. [[File:EXPOBAR BREWTUS IV Wand Nut.jpg|400px|thumbnail|center|Unscrew the nut circled in red.]]
| |
| − | ##Once the wand is removed you may have parts stick to the valve assembly. Do not lose these parts. [[File:EXPOBAR BREWTUS IV Wand Nut Removed.jpg|400px|thumbnail|center|The arrow points to the white teflon o-ring that may be stuck to the steam valve. The tension spring may also be stuck in the steam valve like the picture shows.]]
| |
| − | ##The inspect the o-ring and the tension spring to make sure they are in good condition. The spring should be really firm. If it is easily compressed then it may need to be replaced. Make sure these parts are clean and reinstall them. When installing the o-ring, there will be a side that is flatter. Make sure this is facing upwards when you reassemble the parts. [[File:EXPOBAR BREWTUS IV Wand Blowout.jpg|400px|thumbnail|center|Parts of the wand ball joint.]]
| |
| − | |valve_attach_instr = These instructions apply to both the steam and hot water valve assemblies.
| |
| − | ##You will need two open ended wrenches, or adjustable wrenches to tighten this assembly down.
| |
| − | ##First remove the top panel and covering of the machine. Put one of the wrenches on the bolt pictured below. The bolt will be towards the front of the machine, opposite to where the valve assembly attaches to the faceplate.[[File:EXPOBAR BREWTUS IV Internal Valve Bolt.jpg|400px|thumbnail|center|Put the wrench on the bolt circled in red.]]
| |
| − | ##Place the other wrench on the hex shaped flats at the back of the valve assembly. Keep this wrench stationary, and then turn the other wrench to tighten the valve assembly down. [[File:EXPOBAR BREWTUS IV External Valve Bolt.jpg|400px|thumbnail|center|Put the wrench on the wrench flats circled in red.]]
| |
| − | }}
| |
| − |
| |
| − | ===Machine Not Heating Or Powering On===
| |
| − |
| |
| − | {{Troubleshooting-Prosumer-No-Power}}
| |
| − | #The video below also systematically goes through the electronic systems on an Expobar unit. It may help you identify the cause of the issue.
| |
| − | {{#ev:youtube|https://www.youtube.com/watch?v=UIiLeRdVWAU|480|center}}
| |
| − |
| |
| − | {{Troubleshooting-Prosumer-Brew-Cold
| |
| − | |temp_adjust_style = Pressurestat
| |
| − | |pstat_adjust_instr = Instructions for adjusting the pressurestat can be found in the document below:[[File:EXPOBAR OFFICE LEVER 2-Wire Pressurestat Adjustment.pdf|250px|thumbnail|center|2-Wire Pressurestat Adjustment Instructions]]
| |
| − | |hls_instr = Instructions for resetting the high limit switch can be found in the video below: {{#ev:youtube|https://www.youtube.com/watch?v=UIiLeRdVWAU|480|center|||start=710}}
| |
| − | |element_testing_instr = Instructions for testing the heating element can be found in the video below: {{#ev:youtube|https://www.youtube.com/watch?v=UIiLeRdVWAU|480|center|||start=774}}
| |
| − | #:It is highly suggested that if the machine has a bad heating element that the machine be sent in for repair. Replacement of this element is complex, and can cause damage to the machine if not done properly. We suggest reviewing the instructions below before purchasing an element. If you are not comfortable with any part of the instructions you should not attempt the replacement.[[File:EXPOBAR ALL Replacing The Element.pdf|250px|thumbnail|center|Element Replacement Instructions]]
| |
| − | }}
| |
| − |
| |
| − | {{Troubleshooting-Prosumer-Steam-Cold
| |
| − | |steam_test_instr = Instructions for doing a steam test for the machine can be found in the video below: {{#ev:youtube|https://www.youtube.com/watch?v=iM_kVx-Fr3M|480|center}}
| |
| − | |temp_adjust_style = Pressurestat
| |
| − | |pstat_adjust_instr = Instructions for adjusting the pressurestat can be found in the document below:[[File:EXPOBAR OFFICE LEVER 2-Wire Pressurestat Adjustment.pdf|250px|thumbnail|center|2-Wire Pressurestat Adjustment Instructions]]
| |
| − | |hls_instr = Instructions for resetting the high limit switch can be found in the video below: {{#ev:youtube|https://www.youtube.com/watch?v=UIiLeRdVWAU|480|center|||start=710}}
| |
| − | |element_testing_instr = Instructions for testing the heating element can be found in the video below: {{#ev:youtube|https://www.youtube.com/watch?v=UIiLeRdVWAU|480|center|||start=774}}
| |
| − | #:It is highly suggested that if the machine has a bad heating element that the machine be sent in for repair. Replacement of this element is complex, and can cause damage to the machine if not done properly. We suggest reviewing the instructions below before purchasing an element. If you are not comfortable with any part of the instructions you should not attempt the replacement.[[File:EXPOBAR ALL Replacing The Element.pdf|250px|thumbnail|center|Element Replacement Instructions]]
| |
| − | }}
| |
| − |
| |
| − | {{Troubleshooting-Prosumer-No-Heat
| |
| − | |hls_reset_instr = Instructions for resetting the high limit switch can be found in the video below: {{#ev:youtube|https://www.youtube.com/watch?v=UIiLeRdVWAU|480|center|||start=710}}
| |
| − | }}
| |
| − |
| |
| − | ===Portafilter Handle Not Fitting On Machine===
| |
| − |
| |
| − | {{Troubleshooting-Prosumer-Portafilter}}
| |
| − |
| |
| − | ==Diagrams & Manuals==
| |
| − |
| |
| − | {{Support-Documents
| |
| − | |title = Expobar Office Lever
| |
| − | |hydraulic_diagram = [[File:OFFICE LEVER Hydraulic Diagram.pdf|150px]]
| |
| − | |machine_manual = [[File:OFFICE LEVER Machine Manual.pdf|150px]]
| |
| − | |parts_diagram = [[File:OFFICE LEVER Parts Diagram.pdf|150px]]
| |
| − | }}
| |
| − |
| |
| − | ==Specifications==
| |
| − |
| |
| − | {{Specifications-Prosumer
| |
| − | |basic_specs = Yes
| |
| − | |width = 10.5 in.
| |
| − | |height = 15 in.
| |
| − | |depth = 17.5 in.
| |
| − | |weight = 54 lbs.
| |
| − | |watts = 1428
| |
| − | |volts = 120
| |
| − |
| |
| − | |housing = Yes
| |
| − | |housing_material = Stainless Steel
| |
| − | |drip_tray_material = Stainless Steel
| |
| − | |drip_tray_cover_material = Stainless Steel
| |
| − | |drip_tray_capacity = 20 oz.
| |
| − | |power_cord_length = 40 in.
| |
| − |
| |
| − | |cup_height = Yes
| |
| − | |max_cup_height = 3.5 in.
| |
| − |
| |
| − | |frothing = Yes
| |
| − | |wand_material = Stainless Steel
| |
| − | |wand_style = Commercial Style
| |
| − | |wand_movement = Articulating
| |
| − | |usable_length = 7.75 in.
| |
| − | |height_off_counter = 4-6.5 in.
| |
| − | |number_of_holes = 1
| |
| − | |no_burn_wand = Yes
| |
| − | |optional_tips = Yes
| |
| − |
| |
| − | |water_source = Yes
| |
| − | |source_type = Reservoir
| |
| − | |reservoir_capacity = 93 oz.
| |
| − | |reservoir_material = Plastic
| |
| − | |reservoir_removable = Yes
| |
| − |
| |
| − | |controls = Yes
| |
| − | |control_type = Lever
| |
| − | |display_type = LED
| |
| − | |pre_infusion = Yes
| |
| − | |low_water_warning = Yes
| |
| − | |pressure_gauges = Steam
| |
| − |
| |
| − | |cup_warmer = Yes
| |
| − | |warmer_material = Stainless Steel
| |
| − | |warmer_size = 10 in. x 10 in.
| |
| − | |warmer_type = Passive
| |
| − |
| |
| − | |portafilter = Yes
| |
| − | |portafilter_material = Chrome Plated Brass
| |
| − | |portafilter_type = Commercial Style
| |
| − | |quantity_included = 1
| |
| − | |portafilter_weight = 1 lbs
| |
| − | |portafilter_diameter = 58 mm.
| |
| − | |commercial_baskets = Sinlge & Double
| |
| − | |pod_compatibility = Pod Kit Available
| |
| − | |bottomless_portafilter = Yes
| |
| − | |tamper_size = 58 mm.
| |
| − |
| |
| − | |brew_group = Yes
| |
| − | |group_material = Chrome Plated Brass
| |
| − | |group_type = E-61
| |
| − | |preheat = Yes
| |
| − | |solenoid = Manual
| |
| − | |capsule_friendly = Pod Kit Available
| |
| − | |back_flushable = Yes
| |
| − |
| |
| − | |boiler_data = Yes
| |
| − | |num_boilers = 1
| |
| − | |brew_steam_simultaneous = Yes
| |
| − |
| |
| − | |brew_boiler = Yes
| |
| − | |brew_boiler_type = Heat Exchanger
| |
| − | |brew_boiler_wattage = 1250
| |
| − | |brew_boiler_volume = 1.7 Liter
| |
| − | |brew_boiler_material = Copper
| |
| − | |brew_boiler_orientation = Vertical
| |
| − | |brew_element_location = Internal
| |
| − | |brew_boiler_autofill = Yes
| |
| − | |brew_boiler_insulated = Yes
| |
| − |
| |
| − | |steam_boiler = Yes
| |
| − | |steam_boiler_type = One Boiler For Steam/Brew
| |
| − |
| |
| − | |pump_data = Yes
| |
| − | |pump_type = Vibration
| |
| − | |pump_wattage = 41
| |
| − | |pump_pressure = 15 Bar
| |
| − | |pump_pressure_adjust = Yes
| |
| − | |pump_deairator = Yes
| |
| − | |pump_self_prime = 8 to 9 bar
| |
| − |
| |
| − | |performance = Yes
| |
| − | |heat_up = 420 s.
| |
| − | |recommended_heat_up = 900 s.
| |
| − | |steam_time_8 = 9 s.
| |
| − | |hot_water_temp_8 = 195 F°
| |
| − | |hot_water_time_8 = 13 s.
| |
| − | |brew_sound_level = 60 Db
| |
| − |
| |
| − | |details = Yes
| |
| − | |manufacture_country = Spain
| |
| − | |recommended_application = Home/Commercial
| |
| − | }}
| |
| − |
| |
| − | <!-- Categories -->
| |
| | [[Category:Expobar]] | | [[Category:Expobar]] |
| − | [[Category:Prosumers]]
| |