Difference between revisions of "Gaggia Classic"
From Whole Latte Love Support Library
(Created page with "The Gaggia Classic is a semi-automatic espresso machine which has been a favorite in the industry for home espresso brewing. == Machine Description == ---- The current...") |
(added video of how to reattach decompression duct) |
||
| (47 intermediate revisions by 6 users not shown) | |||
| Line 1: | Line 1: | ||
| − | + | {{Getting-Started | |
| − | + | |brand = Gaggia | |
| − | == | + | |machine_type = Semi-Automatics |
| − | + | |product_page_title = Gaggia Classic | |
| + | |product_banner = [[File:Wiki_ProductPageBanner_1200x175_GaggiaClassic_v1.jpg| link=]] | ||
| + | |page_type = set up | ||
| + | |section1 = The Unboxing | ||
| + | |anchor1 = Install | ||
| + | |section2 = Get the Water Flowing | ||
| + | |anchor2 = Priming | ||
| + | |section3 = Get it Good & Hot | ||
| + | |anchor3 = Heating | ||
| + | |section4 = Get Brewing | ||
| + | |anchor4 = Brewing | ||
| + | |section5 = Get Frothing | ||
| + | |anchor5 = Frothing | ||
| + | |section6 = The Latte Art Wand | ||
| + | |anchor6 = Latte Art Wand | ||
| + | }} | ||
---- | ---- | ||
| + | ===The Unboxing=== | ||
| + | {{Content-Columns | ||
| + | |column_1 = | ||
| + | # Get the power cord and the accessories out of the water tank. | ||
| + | #* Remove the drip tray. | ||
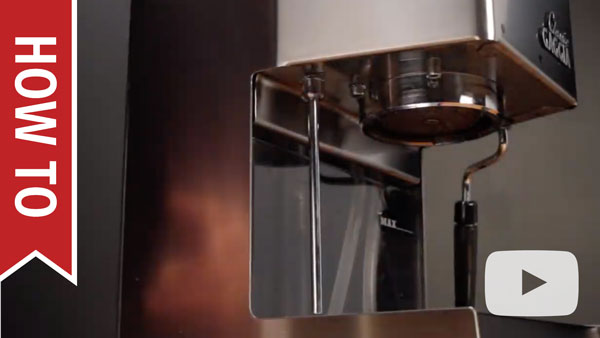
| + | #* Remove the metal tube sticking down on the left side of the machine, between the drip tray and the top of the machine. | ||
| + | #:Be careful not to twist the metal tube, rather pull straight down. If you accidentally twist and the decompression duct becomes disconnected, follow the instructions in the video on the right to reinstall it. | ||
| + | #* Remove the water tank and retrieve the accessories. Plug the cord into the back of the machine. | ||
| + | # Plug the machine directly into an outlet. Don't plug it into surge protectors, extension cords, or timers. | ||
| + | # Fill the water tank to the max fill line, making sure the inlet/outlet tubes are submerged. | ||
| + | |column_2 = | ||
| + | [[File:Wiki-YT-HowToReplaceGaggiaDecompressionDuct.jpg|center|link=https://www.youtube.com/watch?v=e5Rhnu5FC2c&feature=youtu.be]] | ||
| + | |media_caption = | ||
| + | How to Attach the Decompression Duct | ||
| + | }} | ||
| + | ---- | ||
| + | {{Content-Columns | ||
| + | |column_1 = | ||
| + | ===Get the Water Flowing=== | ||
| + | # Place a cup under the steam wand. Turn the steam knob to the open position. | ||
| + | # Flip the power, brew, and steam switches so they're all on. | ||
| + | # Dispense water until 3-4 oz. has been dispensed into the cup. | ||
| + | <!-- Hiding this for now, until we get better force priming instructions. #* If no water is coming out after 30 seconds, is water leaving the tank? | ||
| + | #* If water is not leaving the tank, power off the machine and begin force priming. This is normal. It happens. | ||
| + | #* Take the priming pump and insert it into the inlet line. Facing the machine, the inlet line is the leftmost of the two. --> | ||
| + | # Once the machine is primed, close the knob and switch the steam and brew buttons off. | ||
| + | |column_2 = [[File:Wiki-YT-HowToPrimeYourGaggiaClassic.jpg|center|link=https://youtu.be/ca0LOoReSY8?t=339]] | ||
| + | |media_caption =Gaggia Classic: Installation | ||
| + | }} | ||
| + | ---- | ||
| + | {{Content-Columns | ||
| + | |column_1 = | ||
| + | ===Get it Good & Hot=== | ||
| + | It's time to get heated. | ||
| − | |||
| − | + | With the machine on, the boiler will be at temperature within a few minutes. We suggest waiting 10-15 minutes before using the machine, with the portafilter attached while the machine heats. Take this time to enjoy some light reading or call a friend to boast about your new espresso machine. | |
| + | |||
| + | Just don't leave it on forever. The machine won't like that. | ||
| + | |column_2 = [[File:Get_hot.jpg|center|600px|caption]] | ||
| + | |media_caption = | ||
| + | }} | ||
| + | ---- | ||
| + | {{Content-Columns | ||
| + | |column_1 = | ||
| + | ===Get Brewing=== | ||
| + | # Grind your beans into the portafilter. | ||
| + | # Tamp your grounds with about 30 lbs. of pressure. | ||
| + | # Lock the portafilter into the brew group. | ||
| + | # Flip the brew switch down to brew. | ||
| + | #* Aim for 2 to 2.5 oz. in about 25 seconds. | ||
| + | |column_2 = [[File:Wiki-YT-BasicEspressoTechnique-DialingGrindSize.jpg|center|link=https://youtu.be/iwHdm5GtNHI]] | ||
| + | |media_caption = How To: Basic Espresso Technique - Dialing in Grind Size | ||
| + | }} | ||
---- | ---- | ||
| + | ===How to Use Gaggia Espresso Machine Filter Baskets=== | ||
| + | {{Content-Columns | ||
| + | |column_1 = | ||
| + | For new users, we recommend that you pop in the pressurized basket and 2-way pin into your portafilter. The 2-way pin is a small, black plastic piece that should be installed beneath the brew basket, with the tapered side down. The pressurized basket takes it easy on you when it comes to the nuance of tamping, grind size, and dosing. To swap baskets, you can use the lip of a spare basket to pry the installed basket out of the portafilter. | ||
| + | For now, stick with double shots until you're comfortable pulling a shot. If you are having trouble getting good results, give us a call. We've got your back. | ||
| + | |column_2 = | ||
| + | [[File:Wiki-YT-HowToUseGaggiaEspressoMachineFilterBaskets.jpg |center|link=https://youtu.be/DSZR7YwPFvA]] | ||
| + | |media_caption = | ||
| + | How to Use Gaggia Filter Baskets | ||
| + | }} | ||
| + | ---- | ||
| + | {{Content-Columns | ||
| + | |column_1 = | ||
| + | ===Get Frothing=== | ||
| + | If you plan on steaming with the machine, but don't know how, we've got some tips for you. | ||
| − | |||
| + | #Press the steam button. Wait to reach temperature. Easy. | ||
| + | #Purge the steam wand. | ||
| + | #* Open the steam knob. Leave the steam knob open until mostly steam is jetting out. | ||
| + | #* Close the steam knob. | ||
| + | # You are now ready to begin frothing. | ||
| + | |column_2 =[[File:Wiki-YT-HowToFrothingWithYourGaggiaClassic.jpg|center|link=https://youtu.be/jCn9NjTuGLM?t=305]] | ||
| + | |media_caption =Gaggia Classic: How to Use | ||
| + | }} | ||
| + | ---- | ||
| + | {{Content-Columns | ||
| + | |column_1 = | ||
| + | ===The Latte Art Wand=== | ||
| − | === | + | For more stylish creations and finer control while frothing milk, the Latte Art Pannarello Wand attachment turns the Classic into a tiny Barista. |
| + | |column_2 = [[File:Wiki-YT-HowToGaggiaLatteArtPannarelloWand.jpg|center|link=https://www.youtube.com/watch?v=Suk60t1Bdhk]] | ||
| + | |media_caption =How To: The Gaggia Latte Art Pannarello Wand | ||
| + | }} | ||
| + | [[Category:Gaggia]] | ||
Latest revision as of 13:30, 15 March 2019


The Unboxing
- Get the power cord and the accessories out of the water tank.
- Remove the drip tray.
- Remove the metal tube sticking down on the left side of the machine, between the drip tray and the top of the machine.
- Be careful not to twist the metal tube, rather pull straight down. If you accidentally twist and the decompression duct becomes disconnected, follow the instructions in the video on the right to reinstall it.
- Remove the water tank and retrieve the accessories. Plug the cord into the back of the machine.
- Plug the machine directly into an outlet. Don't plug it into surge protectors, extension cords, or timers.
- Fill the water tank to the max fill line, making sure the inlet/outlet tubes are submerged.
How to Attach the Decompression Duct
Get the Water Flowing
- Place a cup under the steam wand. Turn the steam knob to the open position.
- Flip the power, brew, and steam switches so they're all on.
- Dispense water until 3-4 oz. has been dispensed into the cup.
- Once the machine is primed, close the knob and switch the steam and brew buttons off.
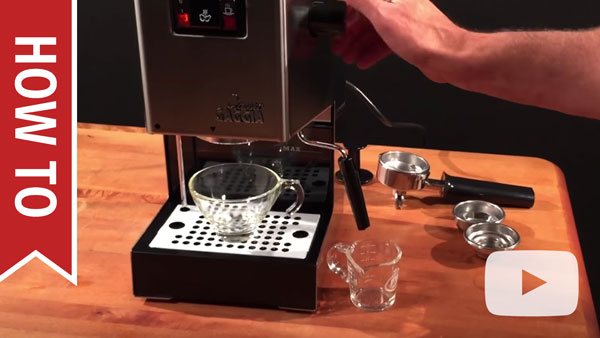
Gaggia Classic: Installation
Get it Good & Hot
It's time to get heated.
With the machine on, the boiler will be at temperature within a few minutes. We suggest waiting 10-15 minutes before using the machine, with the portafilter attached while the machine heats. Take this time to enjoy some light reading or call a friend to boast about your new espresso machine.
Just don't leave it on forever. The machine won't like that.

Get Brewing
- Grind your beans into the portafilter.
- Tamp your grounds with about 30 lbs. of pressure.
- Lock the portafilter into the brew group.
- Flip the brew switch down to brew.
- Aim for 2 to 2.5 oz. in about 25 seconds.

How To: Basic Espresso Technique - Dialing in Grind Size
How to Use Gaggia Espresso Machine Filter Baskets
For new users, we recommend that you pop in the pressurized basket and 2-way pin into your portafilter. The 2-way pin is a small, black plastic piece that should be installed beneath the brew basket, with the tapered side down. The pressurized basket takes it easy on you when it comes to the nuance of tamping, grind size, and dosing. To swap baskets, you can use the lip of a spare basket to pry the installed basket out of the portafilter.
For now, stick with double shots until you're comfortable pulling a shot. If you are having trouble getting good results, give us a call. We've got your back.
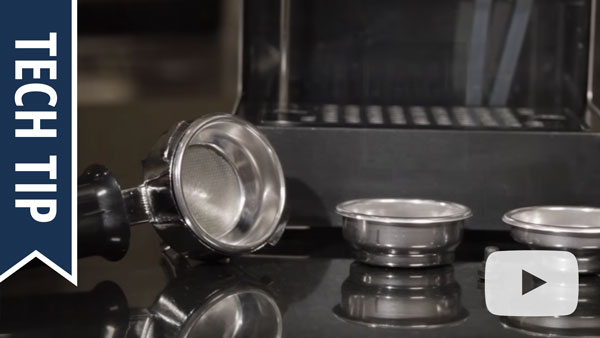
How to Use Gaggia Filter Baskets
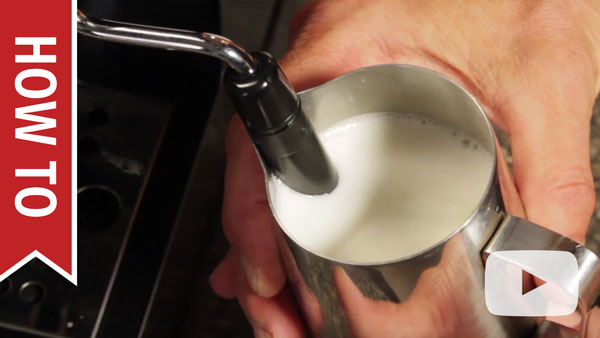
Get Frothing
If you plan on steaming with the machine, but don't know how, we've got some tips for you.
- Press the steam button. Wait to reach temperature. Easy.
- Purge the steam wand.
- Open the steam knob. Leave the steam knob open until mostly steam is jetting out.
- Close the steam knob.
- You are now ready to begin frothing.
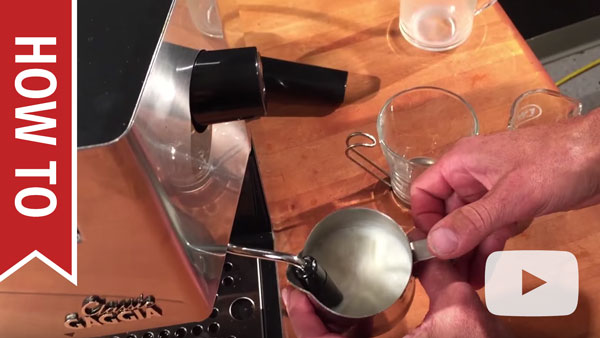
Gaggia Classic: How to Use
The Latte Art Wand
For more stylish creations and finer control while frothing milk, the Latte Art Pannarello Wand attachment turns the Classic into a tiny Barista.
How To: The Gaggia Latte Art Pannarello Wand