|
|
| (10 intermediate revisions by 3 users not shown) |
| Line 1: |
Line 1: |
| − | The Gaggia Velasca is a [https://en.wikipedia.org/wiki/Espresso_machine#Automation super-automatic] espresso machine that features beverage programming.
| + | {{Getting-Started |
| − | | + | |brand = Gaggia |
| − | {{Description-Table | + | |machine_type = Super-Automatics |
| − | |title = Gaggia Velasca | + | |product_banner = [[File:Wiki_ProductPageBanner_1200x175_GaggiaVelasca_v1.jpg]] |
| − | |machine_image = [[File:Gaggia-velasca-wiki.jpg|400px|none]] | + | |product_page_title = Gaggia Velasca |
| − | |manufacturer = Gaggia | + | |page_type = set up |
| − | |model_name = Velasca | + | |section1 = Install It |
| − | |model_number = RI8260/47 | + | |anchor1 = Install It |
| − | |type = [[:Category:Super-Automatics|Super-Automatic]] | + | |section2 = Educate Yourself |
| − | |buy_button = Yes | + | |anchor2 = Educate Yourself |
| − | |button_size = 400px | + | |section3 = Get the Right Beans |
| − | |button_link = https://www.wholelattelove.com/gaggia-velasca-automatic-coffee-and-espresso-machine | + | |anchor3 = Get the Right Beans |
| | + | |section4 = Find the Right Grind |
| | + | |anchor4 = Find the Right Grind |
| | + | |section5 = Get Frothing |
| | + | |anchor5 = Get Frothing |
| | + | |section6 = Froth Better |
| | + | |anchor6 = Froth Better |
| | + | |section7 = Frothing and Habits to Avoid |
| | + | |anchor7 = Frothing Mistakes |
| | + | |section8 = Steam & the Heating Sweet Spot |
| | + | |anchor8 = Steaming Temperature |
| | + | |section9 = Steam with Thermometers |
| | + | |anchor9 = Steam with Thermometers |
| | + | |section10 = The Gaggia Latte Art Wand |
| | + | |anchor10 = Latte Art Wand |
| | + | |section11 = Basic Operation and Programming |
| | + | |anchor11 = Operation & Programming |
| | }} | | }} |
| − | | + | {{Super-Set-Up-Content |
| − | ==Getting Started==
| + | |steam_wand = yes |
| − | | + | |pannarello = yes |
| − | There are critical differences in how Super-Automatic machines work in comparison to semi-automatic or manual units which are vital to be aware of. A working knowledge of the machine prior to first-time use will help ensure a satisfying experience, increase the longevity of the unit, and prevent errors or damage that can result from misuse. The information in this section will cover machine set-up and basic use. To start, the video below provides five useful tips to help you understand your super-automatic machine:
| + | |
| − | | + | |
| − | {{#ev:youtube|https://youtu.be/-RV6bHJSV_8|480|center}} | + | |
| − | | + | |
| − | ===Bean Selection & Compatibility===
| + | |
| − | | + | |
| − | This is crucial. Before setting up the machine it's best to review this topic. The most important thing to understand about Super-Automatic machines is that they do not accept oily, caramelized, or flavored beans. The video below discusses what variety of beans are compatible with your machine, and which beans are not:
| + | |
| − | {{#ev:youtube|https://youtu.be/XePJBDU_svQ|480|center}}
| + | |
| − | | + | |
| − | ===First Time Use===
| + | |
| − | | + | |
| − | The machine manual provides a detailed set-up guide, but all that information can be overwhelming. In this section we will walk you through the most important steps of machine set-up.
| + | |
| − | | + | |
| − | ====Initial Setup/Priming====
| + | |
| − | | + | |
| − | When the machine is first unpacked, there are several things to consider before powering up the unit. You may notice water or grounds in the machine. This is normal. All machines are manufacturer tested before leaving the factory.
| + | |
| − | | + | |
| − | #First, make sure all of the components are fully inserted into the machine.
| + | |
| − | #If the machine came with an Intenza filter do not install it at this time. This should be installed after the machine has been fully primed and set up.
| + | |
| − | #Plug the machine directly into an outlet. Because this is a high power unit it should not be plugged into surge protectors, extension cords, or timers. The cord of the machine can be removed from the machine itself. Please make sure the cord is secure on the end attached to the machine.
| + | |
| − | #Fill the water tank and firmly reinsert it.
| + | |
| − | #Power the unit on. The machine should now go through an initial start-up/priming cycle. If the machine does not complete the priming cycle successfully, make sure the AquaClean filter is removed and the tank is firmly inserted. If the machine does not prime, then the machine may need to be force primed. Contact Technical Support for more information if this happens -- force priming is normal and expected as the machines are drained to prevent leaking/freezing damage during shipping of the product.
| + | |
| − | #Once the machine has completed automatic priming, you will want to manually prime the unit to ensure the system is properly filled with water. To do this activate the machine's hot water function and pull 3-4 oz. of liquid through. The machine should now be fully primed. Proceed to the next section.
| + | |
| − | | + | |
| − | ====Beans/Grinder Set-Up====
| + | |
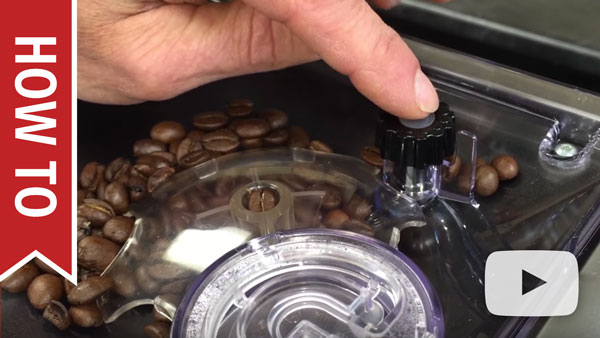
| − | After the machine has been successfully primed, it is important to set the grinder for initial use. The grinder setting should only be adjusted while the grinder is running if adjusting for a finer grind. The finer grind settings are indicated by lower numbers.
| + | |
| − | | + | |
| − | #The grinder should be set to the coarsest grind setting for initial use (15, in this case). This is indicated by the largest number on the grinder dial. Once the dial is set, you can add beans to the hopper. Make sure to only add dry beans as described in the [[#Bean Compatibility|Bean Compatibility]] section.
| + | |
| − | #Set the aroma to the maximum setting using the aroma adjustment button. This increases how much coffee the grinder will grind at a time. This will help the grinder mechanism fill with beans/grounds faster for the next step.
| + | |
| − | #Next choose one of the brewing options. The first few shots of the machine may come out watery or weak. This is to be expected, as the beans need to feed into the grinder, and the bypass chamber needs to fill. Depending on the machine/type of bean used it can take up to 5-10 attempts.
| + | |
| − | #Once your shots are being pulled with consistency, then you are free to make adjustments to better fit your tastes. Adjustments are covered in the next section.
| + | |
| − | [[File:Gaggia-beans-grinder-set-up.png|thumb|center]]
| + | |
| − | | + | |
| − | Error opening the bean hopper lid: Troubleshooting instructions.
| + | |
| − | | + | |
| − | [[File:Velasca Bean Hopper Lid Open Error.pdf|200px|thumb|center|"Bean hopper lid open" error]]
| + | |
| − | | + | |
| − | ====Drink Adjustment====
| + | |
| − | Your machine is now ready to brew, however, the startup settings may not match the drink you are trying to brew. For the demonstration purposes this section will walk through brewing a single shot espresso from the machine.
| + | |
| − | | + | |
| − | #Set the machine to the three bean aroma setting using the aroma/pre-ground button. This full aroma setting is typically best for espresso extraction, but it can be lowered if the coffee is too strong.
| + | |
| − | #Adjust the grinder fineness dial down to the finest grind setting, which is the lowest number (1, in this case). This adjustment must be done while the grinder is running. In order to do this, press one of the brewing functions to activate the grinder. When you hear the grinder activate, the dial can be turned. Turn the dial gradually to prevent jamming. If you cannot get the dial all the way down to the finest setting, you can always run another shot to adjust further.
| + | |
| − | #Most super-automatic machines are pre-programmed to pull 1.5-2 oz. for the espresso option despite being single shot machines. For best results we suggest reprogramming the shot size to 1 oz. Shot sizes can be easily reprogrammed on this unit by pressing and holding the drink button you would like to reprogram. Hold the button for at least 5 seconds until the grinder activates and then let go. Use a measuring device to measure the liquid volume being dispensed. Once you have 1 oz. in the measuring device press the same brew option to stop the brewing and save the new amount. Instructions from the manual below:[[File:Velasca-prestige-adjusting-coffee-quantity.png|thumb|center|Adjusting the coffee quantity]]
| + | |
| − | #It is critical to consider that this machine uses a smart grinder. Smart grinders make gradual adjustments to how the beans are ground and how much coffee is dosed each shot. After an adjustment is made, the machine will typically take 10-15 shots for best results. The grinder will make gradual changes based on the new adjustment to improve the flavor of the coffee each time. For this same reason, constant adjustments should not be made to the machine, as the smart grinder will not have enough time to adapt to the adjustments.
| + | |
| − | #The videos below discuss how to adjust for other types of drinks. The rule of thumb here is that the greater the volume of water passing through the grounds, the coarser the grounds should be, in order to get a balanced extraction.
| + | |
| − | [[File:Velasca-prestige-adjusting-grind-setting.png|thumb|center|Adjusting the grind setting]]
| + | |
| − | | + | |
| − | {{#ev:youtube|https://youtu.be/5U3o9jMvI3g|480|center}}
| + | |
| − | | + | |
| − | {{#ev:youtube|https://youtu.be/XePJBDU_svQ|480|center}}
| + | |
| − | | + | |
| − | ===Puck Consistency=== | + | |
| − | A common misconception is that super-automatic machines should have a dry coffee puck after the machine is finished brewing. While this is true of other styles of espresso machine, this is not true of a super-automatic unit. Super-automatic machines utilize heat and pressure in the brewing process, which are key to espresso brewing. To aid in this process, a device called a brew unit is used. The brew unit follows a similar but different brewing process compared to a semi-automatic or prosumer style machine. As a result the pucks will not always come out firm and dry. They may come out muddy or broken. This is more common when a coarse grind setting is used.
| + | |
| − | | + | |
| − | This is perfectly normal, and does not indicate damage or malfunction in the machine. The machine will still produce a good tasting extraction layered with crema.
| + | |
| − | | + | |
| − | ===Bypass Doser===
| + | |
| − | | + | |
| − | There are a few things to consider if you plan on using the bypass doser for pre-ground coffee:
| + | |
| − | | + | |
| − | #The bypass doser will only accept 8-9 grams of coffee at a time. The scoop that comes with the machine is for transferring coffee grinds and, as such, it is not useful for measuring. To prevent overfilling the bypass doser, we suggest using a level scoop, and then taking a large pinch out of it. A little bit less than a full scoop is the perfect amount. More info on using the pre-ground feature from the manual below:
| + | |
| − | #If the coffee is ground too coarsely, the resulting shot is going to taste sour, weak, and/or watery. Espresso grounds should be slightly finer than table sugar or sand.
| + | |
| − | #Alternatively, it is also possible to have coffee that is ground too fine. Extremely fine grinds can result in little or no flow from the machine, and very bitter shots. Coffee that is ground too finely can cause blockages in the system that can only be resolved through deep cleaning or a repair.
| + | |
| − | | + | |
| − | <strong>Do not</strong> add whole beans, or entire bags of pre-ground coffee into this chamber. This will cause irreversible damage to the machine's brewing assembly.
| + | |
| − | | + | |
| − | ====Rinsing the Brew Circuit====
| + | |
| − | One useful trick the the bypass function allows for is that you can do a quick rinse of the brew circuit by simply running a bypass cycle and not adding any pre-ground coffee. This will let water flow through the brew circuit which will remove old coffee flavors, oils, and grounds. You may want to do this if you've recently switched beans to remove some of the old flavors.
| + | |
| − | [[File:Super-auto-rinsing-brew-circuit.png|thumb|center|Rinsing the brew circuit instructions]]
| + | |
| − | | + | |
| − | ===Brew Unit/Pump Noises===
| + | |
| − | | + | |
| − | The brew unit will make a few different noises then super-automatic machines are in operation. This is normal. More specifically, you can expect the brew unit to make several loud clicking noises through the duration of the brewing cycle. These loud clicking noises are perfectly normal and will not harm the machine. The brew unit function is mo
| + | |
| − | The brew unit can also make squeaking noises during its operation. The squeaking could be from o-rings sealing on the brew unit, or the brew unit parts sliding along the tracks. If you are hearing more squeaking than normal it may be a sign that the brew unit needs to be cleaned and lubricated. Some squeaking is also normal on very new units as there are o-rings/seals that need some time to wear in.
| + | |
| − | {{#ev:youtube|https://www.youtube.com/watch?v=-oGA5g8jWfc|480|center}}
| + | |
| − | | + | |
| − | ===Mavea Intenza Filter===
| + | |
| − | | + | |
| − | Once setup has been fully completed, the filter can be installed. Installing the filter beforehand could cause the machine to become vapor locked and require manual priming to resolve. Follow the instructions on the filter packaging before installing it. Within the machine menu is an option for activating and installing the filter. If you use this activation menu option for the filter the machine will automatically remind you when the filter needs to be replaced. Instructions for activating this function can be found in the machine manual. The filter's packaging instructions will indicate the filter needs to be activated by soaking in water before it is installed. If the machine gives a priming error when the filter is installed simply remove the filter and soak in warm water upside down for at least an hour and then reinstall it.
| + | |
| − | [[File:Velasca-installing-water-filter.png|thumb|center|Installing the water filter]]
| + | |
| − | [[File:Velasca-installing-water-filter2.png|thumb|center]]
| + | |
| − | [[File:Velasca-installing-water-filter3.png|thumb|center]]
| + | |
| − | | + | |
| − | == Cleaning & Maintenance ==
| + | |
| − | | + | |
| − | {{Maintenance-Gaggia-Super-Automatic}}
| + | |
| − | | + | |
| − | == Troubleshooting ==
| + | |
| − | | + | |
| − | ===No Crema or Bad Tasting Shots===
| + | |
| − | | + | |
| − | {{Troubleshooting-Super-No-Crema-Bad-Shots}}
| + | |
| − | | + | |
| − | ===Difficulty Frothing===
| + | |
| − | | + | |
| − | {{Troubleshooting-Gaggia-Velasca-Wand-Frothing-Issues}}
| + | |
| − | | + | |
| − | ===Flow Issues===
| + | |
| − | | + | |
| − | The first place to start with any flow issue is cleaning the machine. Before going through these steps please make sure the machine is cleaned according to the [[#Cleaning & Maintenance|Cleaning & Maintenance]] section of this article.
| + | |
| − | | + | |
| − | {{Troubleshooting-Gaggia-Velasca-Prestige-No-Flow}}
| + | |
| − | {{Troubleshooting-Gaggia-Accademia-Steam-Blocked}}
| + | |
| − | {{Troubleshooting-Gaggia-Velasca-Prestige-Bew-Block}}
| + | |
| − | {{Troubleshooting-Gaggia-Super-Flow-Meter-Blocked}}
| + | |
| − | | + | |
| − | | + | |
| − | ===Machine Is Leaking===
| + | |
| − | | + | |
| − | {{Troubleshooting-Gaggia-Velasca-Prestige-Bottom-Leaking}}
| + | |
| − | {{Troubleshooting-Gaggia-Super-Wand-Leaking}}
| + | |
| − | | + | |
| − | | + | |
| − | ===Machine Not Heating Or Powering On===
| + | |
| − | | + | |
| − | {{Troubleshooting-Gaggia-Super-No-Power}}
| + | |
| − | {{Troubleshooting-Gaggia-Velasca-No-Steam-E15-Error}}
| + | |
| − | {{Troubleshooting-Gaggia-Accademia-Brew-Cold}}
| + | |
| − | | + | |
| − | | + | |
| − | ===No Beans, Grinder Blocked, Or E01===
| + | |
| − | | + | |
| − | {{Troubleshooting-Gaggia-Super-Grinder-Blocked-NCS}}
| + | |
| − | | + | |
| − | | + | |
| − | ==Continuous Empty Grounds Error==
| + | |
| − | | + | |
| − | {{Troubleshooting-Gaggia-Velasca-Empty-Grounds}}
| + | |
| − | | + | |
| − | ===Brew Unit Blocked, Stuck, or E03 or E04 Error Codes===
| + | |
| − | | + | |
| − | {{Troubleshooting-Gaggia-Accademia-Brew-Unit-Blocked}}
| + | |
| − | | + | |
| − | | + | |
| − | ===Too Much Steam/Milk Boiling===
| + | |
| − | {{Troubleshooting-Super-Steam-Too-Hot
| + | |
| − | |steam_test_instr = [[File:ALL MODELS Steam Test.pdf|250px|thumbnail|center|Steam Test Instructions]]
| + | |
| | }} | | }} |
| − | | + | ===Basic Operation and Programming=== |
| − | | + | {{Content-Columns |
| − | {{Troubleshooting-Gaggia-Velasca-Prestige-Warnings-Errors}} | + | |column_1 = |
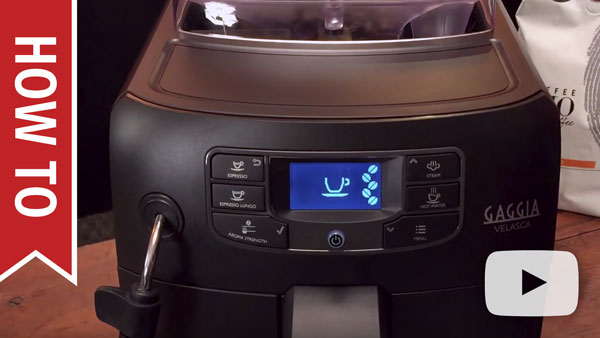
| − | | + | The video on the right provides a rundown on basic operation and programming on the Gaggia Velasca. |
| − | ==Diagrams & Manuals== | + | |column_2 = |
| − | | + | [[File:Wiki-YT-GaggiaVelasca_BasicOperationProgramming.jpg|center|link=https://www.youtube.com/watch?v=KWGiDWrkLxU&feature=youtu.be]] |
| − | ==Specifications==
| + | |media_caption = |
| − | | + | Gaggia Velasca Basic Operation & Programming |
| − | {{Specifications-Gaggia-Velasca}}
| + | }} |
| − | | + | ---- |
| − | <!-- Categories -->
| + | |
| | [[Category:Gaggia]] | | [[Category:Gaggia]] |
| − | [[Category:Super-Automatics]]
| |