|
|
| (8 intermediate revisions by one other user not shown) |
| Line 1: |
Line 1: |
| − | The Pasquini Livia G4 is a [[:Category:Prosumers|Prosumer]] espresso machine which is an updated version of the popular Pasquini Livia 90. {{Description-Table
| + | {{Getting-Started |
| − | |title = Pasquini Livia G4 | + | |brand = Pasquini |
| − | |machine_image = [[File:PASQUINI_LIVIA_G4.gif|400px|none]] | + | |machine_type = Prosumers |
| − | |manufacturer = Pasquini | + | |product_banner = [[File:Wiki_ProductPageBanner_1200x175_PasquiniLiviaG4_PID.jpg]] |
| − | |model_name = Livia G4 | + | |product_page_title = Pasquini Livia G4 PID |
| − | |type = [[:Category:Prosumers|Prosumer]] | + | |page_type = set up |
| − | |buy_button = Yes | + | |section1 = Install It |
| − | |button_size = 400px | + | |anchor1 = Install |
| − | |button_link = https://www.wholelattelove.com/products/pasquini-livia-g4-automatic-w-pid | + | |section2 = Get it Good & Hot |
| | + | |anchor2 = Heating |
| | + | |section3 = Get a Handle on your Tamp |
| | + | |anchor3 = Tamping |
| | + | |section4 = Brew Better |
| | + | |anchor4 = Brew Better |
| | + | |section5 = Brew the Best You Can Brew |
| | + | |anchor5 = Brew Best |
| | + | |section6 = Preinfusion and You |
| | + | |anchor6 = Preinfusion |
| | + | |section7 = Get Frothing |
| | + | |anchor7 = Get Frothing |
| | + | |section8 = Froth Better |
| | + | |anchor8 = Froth Better |
| | + | |section9 = Frothing and Habits to Avoid |
| | + | |anchor9 = Frothing Mistakes |
| | + | |section10 = Steam & the Heating Sweet Spot |
| | + | |anchor10 = Steaming Temperature |
| | + | |section11 = Steam with Thermometers |
| | + | |anchor11 = Steam with Thermometers |
| | }} | | }} |
| − | | + | {{Set-Up-Content |
| − | == Machine Description ==
| + | |dual_boiler = |
| − | | + | |
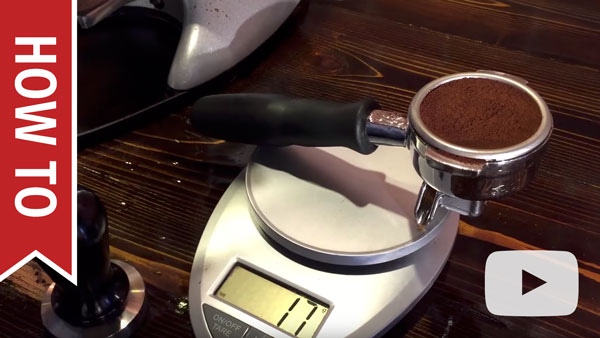
| − | After more than 15 years of excellent service, Pasquini has retired their celebrated Livia 90 espresso machine to make room for its successor, the Pasquini Livia G4. Encased in gorgeous stainless steel, this new machine boasts a plethora of new features both inside and out. Improvements of note include the Livia G4’s actively heated group head, which is regulated by a thermostatically controlled heating element. This helps to ensure temperature stability and reduce the time it takes before the machine is ready to brew. Also new to the Livia G4 are the lever operated steam and hot water arms. As opposed to a traditional valve operated steam arm, the steam lever on the G4 can be locked into place to dispense constant steam or operated manually for greater control over steaming and frothing.
| + | |
| − | | + | |
| − | The Livia G4 sports a 1.5 liter heat exchange boiler, allowing for simultaneous frothing and brewing. Water is drawn from an ample 92 oz. water reservoir. The passively heated cup warmers have a combined 22% greater surface area than the Livia 90. The steam and hot water arms are mounted on ball joints for greater control over positioning. Additionally, the steam arm is insulated internally to keep the surface cooler for longer, helping prevent accidental burns.
| + | |
| − | | + | |
| − | From a technical standpoint, Pasquini has made several changes to help ensure the longevity of the Livia G4. The 1.5 liter heat exchange boiler is now made of stainless steel instead of copper for increased resistance against corrosion, and is now regulated by a safety cut-off breaker to prevent overheating. The electronic control boards have been moved to the bottom of the machine and away from heat sources. The Livia G4 abstains from using an electrical water level probe in favor of a mechanical pressure plate in order to detect when the reservoir is empty.
| + | |
| − | | + | |
| − | The Livia G4 Automatic version offers the benefit of volumetric programmable coffee dosing, allowing for consistent dosing of drinks. There is also a PID temperature controller for precision monitoring and control of brew temperature, and a front facing pump gauge to monitor brew and steam pressure.
| + | |
| − | | + | |
| − | | + | |
| − | ==Basic Usage==
| + | |
| − | ===Getting Started===
| + | |
| − | | + | |
| − | {{#ev:youtube|https://www.youtube.com/watch?v=2VSRXcBZo6c|480|center}} | + | |
| − | | + | |
| − | ===Removing The Cover===
| + | |
| − | | + | |
| − | #Removing the case is simple. Remove the water tank from the machine and tilt the machine on one side. To prevent the case from being scratches put a soft cloth or towel underneath it before tilting it over.
| + | |
| − | #Unscrew the 4 allen bolts from the bottom of the machine using a 2.5 mm. allen key. [[File:LIVIA G4 Bottom Screws.jpg|480px|thumbnail|center|Remove the allen screws from the four locations circled in red.]]
| + | |
| − | #Once the bolts are removed the case can slide of. The front of the case needs to be pulled downwards and then gently bent outwards in order for the case to slide off. There are screws securing the case from the inside that need to slide down and out of a fitted slot to release the case. A picture of this slot is shown below.
| + | |
| − | [[File:LIVIA G4 Internal Screw Hole.jpg|480px|thumbnail|center|Screw Slot]]
| + | |
| − | | + | |
| − | ===Adjusting Brew Pressure===
| + | |
| − | | + | |
| − | Adjusting the brew pressure on this unit is very simple. Brew pressure is controlled by an over pressure valve (OPV), which is adjusted by turning a bolt on the OPS assembly.
| + | |
| − | #[[#Removing The Cover|Remove the cover]] of the machine and attach the portafilter with the backflush disc in.
| + | |
| − | #The adjustment bolt comes off the side of the OPV, which is located on the right hand side of the machine if you are facing the front of the machine. [[File:LIVIA G4 OPV Adjustment.jpg|460px|thumbnail|center|The adjustment bolt is circled in red.]]
| + | |
| − | #Next, activate the brew circuit using the manual brew button. The brew pressure should raise and then stabilize. Once the pressure is stabilized you can turn the adjustment bolt to change the pressure. Turning the bolt clockwise raises the pressure, counterclockwise lowers it.
| + | |
| − | | + | |
| − | ===Adjusting The PID===
| + | |
| − | | + | |
| − | Adjusting the PID is simple on this machine. Unlike other machines, the PID on this machine does not have separate settings for the brew and steam temperatures. Both brew temperature and steam pressure will be raised/lowered when an adjustment is made to the set temperature.
| + | |
| − | | + | |
| − | #To enter the machine into programming mode first make sure the machine is turned on and the PID is displaying the boiler temperature. If the PID says off press the "+" button to turn the boiler on.
| + | |
| − | #Once the temperature is being displayed the PID can be put into programming mode. Press the "−" button and the screen should change to PrG.
| + | |
| − | #When the screen says PrG press the "+" to program the boiler temperature. The currently programmed temperature will be displayed.
| + | |
| − | #Use the "+" and "−" buttons to lower or raise the temperature. Do not set the temperature above 212 F°, or the machine can overpressurize, and the relief valve on the boiler will begin to relieve steam pressure.
| + | |
| − | #The PID will automatically save the programmed temperature after three seconds of the buttons not being pressed, and then it will go back to displaying the current boiler temperature.
| + | |
| − | | + | |
| − | ===Draining The Boilers===
| + | |
| − | | + | |
| − | {{#ev:youtube|https://www.youtube.com/watch?v=ln25nJbyQQc|480|center}}
| + | |
| − | | + | |
| − | == Cleaning & Maintenance ==
| + | |
| − | | + | |
| − | {{Maintenance-Prosumer
| + | |
| − | |single_heat_exchange = Yes | + | |
| | }} | | }} |
| − | | + | [[Category:Pasquini]] |
| − | == Troubleshooting ==
| + | |
| − | | + | |
| − | ===No Crema or Bad Tasting Shots===
| + | |
| − | | + | |
| − | {{Troubleshooting-No-Crema-Bad-Shots}}
| + | |
| − | | + | |
| − | | + | |
| − | ===Difficulty Frothing===
| + | |
| − | | + | |
| − | {{Troubleshooting-Frothing}}
| + | |
| − | | + | |
| − | | + | |
| − | ===Flow Issues===
| + | |
| − | | + | |
| − | The first place to start with any flow issue is cleaning the machine. Before going through these steps please make sure the machine is cleaned according to the [[#Cleaning & Maintenance|Cleaning & Maintenance]] section of this article.
| + | |
| − | | + | |
| − | ====No Steam From Wand====
| + | |
| − | | + | |
| − | #Check the brew function on the machine and see if water is able to flow through the machine for this function.
| + | |
| − | ##If the brew water is not flowing either refer to the [[#No Flow At All]] section of this article
| + | |
| − | ##If the brew water flows but is not hot refer to the [[#On But Not Heating]] section of this article.
| + | |
| − | #Check the hot water function of the machine. If you are able to draw hot water then the steam boiler must be pressurizing and heating, because hot water is expelled from the machine by steam pressure.
| + | |
| − | ##Remove the tip from the steam wand and test the flow. If flow is restored then the tip needs to be cleaned and reattached.
| + | |
| − | ##If the flow is still blocked then there may be a blockage in the steam wand itself. Clean the wand by using a pipe brush that has synthetic or plastic bristles; metal bristles can damage the wand. Then soak the wand in a solution of hot water and backflushing powder for ten minutes. Test flow again.
| + | |
| − | ##If there still isn't flow then there may be a blockage farther back in the steam circuit. The machine may need to be professionally cleaned to remove the blockage.
| + | |
| − | | + | |
| − | {{Troubleshooting-Prosumer-Brew-Blocked
| + | |
| − | |grouphead_instr = <br />
| + | |
| − | ##To clean the group head first unplug the machine and remove the water reservoir.
| + | |
| − | ##Place down a soft cloth or towel and tilt the machine on its back.
| + | |
| − | ##Use a flathead screwdriver to remove the screw on the bottom of the grouphead. Once the screw is removed the shower screen and the diffuser plate can be removed.
| + | |
| − | ##Soak the parts that were just removed in a solution of hot water and backflushing powder.
| + | |
| − | ##Take a grouphead cleaning brush, or an old toothbrush, and use it to scrub down the grouphead, especially the group gasket. Remove any buildup of coffee residues or grounds; the gasket in particular needs to be clean in order to seal properly with the portafilter.
| + | |
| − | ##After the components are clean the grouphead can be reassembly and then flushed with water by running the brew function.
| + | |
| − | |backflush_instr = Instructions for backflushing this style of machine are found in the video below: {{#ev:youtube|https://www.youtube.com/watch?v=k1Vkfj83uyg|480|center}}
| + | |
| − | }}
| + | |
| − | | + | |
| − | ====No Hot Water From Tap====
| + | |
| − | | + | |
| − | #Check the brew function on the machine and see if water is able to flow through the machine for this function.
| + | |
| − | ##If the brew water is not flowing either refer to the [[#No Flow At All]] section of this article
| + | |
| − | ##If the brew water flows but is not hot refer to the [[#On But Not Heating]] section of this article.
| + | |
| − | #Check the steam function of the machine. If you are able to draw steam then the steam boiler must be pressurizing and heating, because hot water is expelled from the machine by steam pressure.
| + | |
| − | ##Remove the tip from the hot water wand and test the flow. If flow is restored then the tip needs to be cleaned and reattached.
| + | |
| − | ##If the flow is still blocked then there may be a blockage in the hot water wand itself. Clean the wand by using a pipe brush that has synthetic or plastic bristles; metal bristles can damage the wand. Then soak the wand in a solution of hot water and backflushing powder for ten minutes. Test flow again.
| + | |
| − | ##If there still isn't flow then there may be a blockage farther back in the hot water circuit. The machine may need to be professionally cleaned to remove the blockage.
| + | |
| − | | + | |
| − | ====No Flow At All====
| + | |
| − | | + | |
| − | {{Troubleshooting-Prosumer-No-Flow-At-All
| + | |
| − | |water_supply = Reservoir
| + | |
| − | |sensor_instr = Remove the cover of the machine and check the wiring to the sensor to make sure it is connected and in good condition.
| + | |
| − | |pump_instr = Check to make sure there are no loose or disconnected wires on the pump.
| + | |
| − | |valve_instr = The machine may need to be professionally repaired.
| + | |
| − | }}
| + | |
| − | | + | |
| − | | + | |
| − | ===Machine Is Leaking===
| + | |
| − | | + | |
| − | {{Troubleshooting-Prosumer-Bad-Gasket
| + | |
| − | |gasket_instr = <br />
| + | |
| − | ##To clean the group head first unplug the machine and remove the water reservoir.
| + | |
| − | ##Place down a soft cloth or towel and tilt the machine on its back.
| + | |
| − | ##Use a flathead screwdriver to remove the screw on the bottom of the grouphead. Once the screw is removed the shower screen and the diffuser plate can be removed.
| + | |
| − | ##Soak the parts that were just removed in a solution of hot water and backflushing powder.
| + | |
| − | ##Next the group gasket needs to be removed. The gasket on the Livia G4 will have a few grooves around the perimeter. Using an awl or a small flathead screwdriver pry the gasket out; the grooves on the gasket are an easy access point to help leverage the gasket out. Gaskets that are particularly old or worn out may get stuck into the grouphead. One trick is to partially screw some self-tapping screwing into the gasket; be careful not to go too far or the screws will puncture the other side of the gasket and possibly damage the grouphead. Then use a pair of needle-nose pliers to pull on the screws. The gasket will come out with the screws.
| + | |
| − | ##Once the gasket is removed use a grouphead brush or old toothbrush to screw down the grouphead really well. Make sure to remove any built-up coffee residues or coffee grinds.
| + | |
| − | ##When the grouphead is clean the new gasket can be installed. The gasket will have a tapered edge and a flat edge. The flat edge needs to fat the top of the grouphead, and the tapered edge needs to be exposed so that the it can seal with the portafilter. Press firmly all along the edges of the gasket until it is fully in place and is not sticking up anywhere along the circumference.
| + | |
| − | ##Reinstall the diffuser, screen, and screw. Once everything is back together firmly attach the portafilter a few times to help the gasket seat properly, but do not over tighten.
| + | |
| − | }}
| + | |
| − | | + | |
| − | {{Troubleshooting-Prosumer-E61-Leak
| + | |
| − | |lever_style =
| + | |
| − | |lever_leak_instr =
| + | |
| − | |top_valve_leak_instr =
| + | |
| − | |bottom_valve_leak_instr =
| + | |
| − | |E61_group_cleaning_instr =
| + | |
| − | |E61_attach_instr =
| + | |
| − | }}
| + | |
| − | | + | |
| − | {{Troubleshooting-Prosumer-Bottom-Leak
| + | |
| − | |water_source =
| + | |
| − | |tube_reservoir =
| + | |
| − | |level_probe_instr =
| + | |
| − | |drain_line =
| + | |
| − | }}
| + | |
| − |
| + | |
| − | {{Troubleshooting-Prosumer-Top-Steaming
| + | |
| − | |vacuum_cleaning_instr =
| + | |
| − | |vacuum_replace_link =
| + | |
| − | |steam_adjust_style =
| + | |
| − | |pstat_adjust_instr =
| + | |
| − | |relief_stuck_instr =
| + | |
| − | }}
| + | |
| − | | + | |
| − | {{Troubleshooting-Prosumer-Wand-Leak
| + | |
| − | |knob_instr =
| + | |
| − | |descalable =
| + | |
| − | |valve_rep_instr =
| + | |
| − | |tip_instr =
| + | |
| − | |ball_joint_instr =
| + | |
| − | |valve_attach_instr =
| + | |
| − | }}
| + | |
| − | | + | |
| − | ===Machine Not Heating Or Powering On===
| + | |
| − | | + | |
| − | {{Troubleshooting-Prosumer-No-Power}}
| + | |
| − | | + | |
| − | {{Troubleshooting-Prosumer-Brew-Cold
| + | |
| − | |temp_adjust_style =
| + | |
| − | |pid_adjust_instr =
| + | |
| − | |pstat_adjust_instr =
| + | |
| − | |hls_instr =
| + | |
| − | |element_testing_instr =
| + | |
| − | }}
| + | |
| − | | + | |
| − | {{Troubleshooting-Prosumer-Steam-Cold
| + | |
| − | |steam_test_instr =
| + | |
| − | |temp_adjust_style =
| + | |
| − | |pid_adjust_instr =
| + | |
| − | |pstat_adjust_instr =
| + | |
| − | |hls_instr =
| + | |
| − | |element_testing_instr =
| + | |
| − | }}
| + | |
| − | | + | |
| − | {{Troubleshooting-Prosumer-No-Heat
| + | |
| − | |tank_instructions =
| + | |
| − | |dual_boiler =
| + | |
| − | |hls_reset_instr =
| + | |
| − | }}
| + | |
| − |
| + | |
| − | ===Portafilter Handle Not Fitting On Machine===
| + | |
| − | | + | |
| − | {{Troubleshooting-Prosumer-Portafilter}}
| + | |
| − | | + | |
| − | ==Diagrams & Manuals==
| + | |
| − | | + | |
| − | {{Support-Documents
| + | |
| − | |table_style =
| + | |
| − | |title =
| + | |
| − | |electrical_diagram =
| + | |
| − | |hydraulic_diagram =
| + | |
| − | |machine_manual =
| + | |
| − | |parts_diagram =
| + | |
| − | |service_manual =
| + | |
| − | |startup_guide =
| + | |
| − | }}
| + | |
| − | | + | |
| − | ==Specifications==
| + | |
| − | | + | |
| − | {{Specifications-Prosumer
| + | |
| − | |basic_specs = yes
| + | |
| − | |width = 9.8 in.
| + | |
| − | |height = 14.7 in.
| + | |
| − | |depth = 17.7 in.
| + | |
| − | |weight = 48.5 lbs
| + | |
| − | |watts = 1400
| + | |
| − | |volts = 110
| + | |
| − | | + | |
| − | |housing = yes
| + | |
| − | |housing_material = Stainless Steel
| + | |
| − | |drip_tray_material = Stainless Steel
| + | |
| − | |drip_tray_cover_material = Stainless Steel
| + | |
| − | |drip_tray_capacity = 26 oz
| + | |
| − | |power_cord_length =
| + | |
| − | | + | |
| − | |cup_height =
| + | |
| − | |max_cup_height =
| + | |
| − | | + | |
| − | |frothing = yes
| + | |
| − | |wand_material = Stainless Steel
| + | |
| − | |wand_style = Commercial
| + | |
| − | |wand_movement = Articulating
| + | |
| − | |usable_length =
| + | |
| − | |height_off_counter =
| + | |
| − | |number_of_holes = 2
| + | |
| − | |no_burn_wand = Yes
| + | |
| − | |optional_tips =
| + | |
| − | | + | |
| − | |water_source = yes
| + | |
| − | |source_type = Reservoir
| + | |
| − | |reservoir_capacity = 100 oz
| + | |
| − | |reservoir_material = Plastic
| + | |
| − | |reservoir_removable = Yes
| + | |
| − | | + | |
| − | |controls = yes
| + | |
| − | |control_type = Rocker
| + | |
| − | |display_type = LED
| + | |
| − | |temp_control =
| + | |
| − | |pre_infusion =
| + | |
| − | |low_water_warning = Yes
| + | |
| − | |energy_saving =
| + | |
| − | |pressure_gauges = Brew Only
| + | |
| − | |steam_control =
| + | |
| − | |brew_temp_display = Yes
| + | |
| − | | + | |
| − | |cup_warmer = Yes
| + | |
| − | |warmer_material = Stainless Steel
| + | |
| − | |warmer_size =
| + | |
| − | |warmer_type = Passive
| + | |
| − | | + | |
| − | |portafilter = yes
| + | |
| − | |portafilter_material = Chrome Plated Brass
| + | |
| − | |portafilter_type = Commercial Style
| + | |
| − | |quantity_included =
| + | |
| − | |portafilter_weight = 1.25 lbs
| + | |
| − | |portafilter_diameter = 58 mm
| + | |
| − | |commercial_baskets = Single & Double
| + | |
| − | |pressurized_baskets =
| + | |
| − | |pod_compatibility =
| + | |
| − | |bottomless_portafilter =
| + | |
| − | |tamper_size = 58 mm
| + | |
| − | | + | |
| − | |brew_group = yes
| + | |
| − | |group_material = Chrome Plated Brass
| + | |
| − | |group_type =
| + | |
| − | |preheat = yes
| + | |
| − | |solenoid =
| + | |
| − | |capsule_friendly =
| + | |
| − | |back_flushable = yes
| + | |
| − | | + | |
| − | |boiler_data = yes
| + | |
| − | |num_boilers = 1
| + | |
| − | |brew_steam_simultaneous = Yes
| + | |
| − | | + | |
| − | |brew_boiler = yes
| + | |
| − | |brew_boiler_type = Heat Exchanger
| + | |
| − | |brew_boiler_wattage = 1400
| + | |
| − | |brew_boiler_volume = 1.5 Liter
| + | |
| − | |brew_boiler_material = Copper with Brass End Plates
| + | |
| − | |brew_boiler_orientation = Vertical
| + | |
| − | |brew_element_location = Internal
| + | |
| − | |brew_boiler_autofill = Yes
| + | |
| − | |brew_boiler_insulated =
| + | |
| − | | + | |
| − | |steam_boiler =
| + | |
| − | |steam_boiler_type =
| + | |
| − | |steam_boiler_wattage =
| + | |
| − | |steam_boiler_volume =
| + | |
| − | |steam_boiler_material =
| + | |
| − | |steam_boiler_orientation =
| + | |
| − | |steam_element_location =
| + | |
| − | |steam_vacuum_relief =
| + | |
| − | |steam_boiler_insulated =
| + | |
| − | | + | |
| − | |pump_data =
| + | |
| − | |pump_type =
| + | |
| − | |pump_wattage =
| + | |
| − | |pump_pressure =
| + | |
| − | |pump_pressure_adjust =
| + | |
| − | |pump_deairator =
| + | |
| − | |pump_self_prime =
| + | |
| − | | + | |
| − | |performance = yes
| + | |
| − | |heat_up =
| + | |
| − | |recommended_heat_up = 900 secs
| + | |
| − | |steam_time_8 =
| + | |
| − | |hot_water_temp_8 =
| + | |
| − | |hot_water_time_8 =
| + | |
| − | |hot_water_recovery = 0 secs
| + | |
| − | |brew_sound_level =
| + | |
| − | | + | |
| − | |details = yes
| + | |
| − | |manufacture_country = Italy
| + | |
| − | |nsf_certified =
| + | |
| − | |recommended_application = Home
| + | |
| − | }}
| + | |
| − |
| + | |
| − | <!-- Categories -->
| + | |