|
|
| (12 intermediate revisions by 4 users not shown) |
| Line 1: |
Line 1: |
| − | The Profitec Pro 800 is a [[:Category:Prosumers|Prosumer]] espresso machine that features a stylish body, large 3-liter boiler, and a lever operated brew group. {{Description-Table
| + | {{Getting-Started |
| − | |title = Profitec Pro 800 | + | |brand = Profitec |
| − | |machine_image = [[File:PRO_800_Product_Image.jpg|400px|none]] | + | |machine_type = Prosumers |
| − | |manufacturer = [[:Category:Profitec|Profitec]] | + | |product_banner = [[File: Wiki_ProductPageBanner_1200x175_Profitec800_v1.jpg|link]] |
| − | |model_name = Pro 800 | + | |product_page_title = Profitec Pro 800 |
| − | |type = [[:Category:Prosumers|Prosumer]] | + | |page_type = set up |
| − | |buy_button = Yes | + | |section1 = Install It |
| − | |button_size = 400px | + | |anchor1 = Install |
| − | |button_link = https://www.wholelattelove.com/products/profitec-pro-800-lever-group-espresso-machine | + | |section2 = Get it Good & Hot |
| | + | |anchor2 = Heating |
| | + | |section3 = Get a Handle on your Tamp |
| | + | |anchor3 = Tamping |
| | + | |section4 = Brew Better |
| | + | |anchor4 = Brew Better |
| | + | |section5 = Brew the Best You Can Brew |
| | + | |anchor5 = Brew Best |
| | + | |section6 = Get Frothing |
| | + | |anchor6 = Get Frothing |
| | + | |section7 = Froth Better |
| | + | |anchor7 = Froth Better |
| | + | |section8 = Frothing and Habits to Avoid |
| | + | |anchor8 = Frothing Mistakes |
| | + | |section9 = Steam & the Heating Sweet Spot |
| | + | |anchor9 = Steaming Temperature |
| | + | |section10 = Steam with Thermometers |
| | + | |anchor10 = Steam with Thermometers |
| | + | |section11 = Steam Tip Compatibility |
| | + | |anchor11 = Steam Tip Compatibility |
| | }} | | }} |
| − | ==Basic Usage==
| + | {{Set-Up-Content |
| − | | + | |dual_boiler = |
| − | ===Getting Started===
| + | |e61 = no |
| − | | + | |
| − | {{#ev:youtube|https://www.youtube.com/watch?v=MRi7CjkS9Uc|480|center}} | + | |
| − | | + | |
| − | ===Adjusting The PID===
| + | |
| − | The PID for this machine is located behind the drip tray. Please note that this machine will only have a "t1" setting for the PID, since this is a single boiler machine. This is for steam temperature, and should be set around 250 °F.
| + | |
| − | | + | |
| − | {{#ev:youtube|https://www.youtube.com/watch?v=QprerQKJuPQ|480|center}}
| + | |
| − | | + | |
| − | ===Pre-Infusing===
| + | |
| − | Pre-infusion on this style of machine is simple. Simply pull down the lever and water will seep into the grouphead pre-wetting the grounds. When you are ready to start the shot lift the lever up.
| + | |
| − | | + | |
| − | | + | |
| − | == Cleaning & Maintenance ==
| + | |
| − | ===Backflushing/Descaling===
| + | |
| − | | + | |
| − | Because of internal and group components in this machine it should not be descaled or backflushed. The pump does not actively come on other than to refill the boiler, and there is not a relief for backflushing pressure. To prevent cleaning agents from becoming trapped inside the machine, this machine should only be manually cleaned by a professional repair technician. As such the use of carbon and mineral filtration for the water put into the machine is highly suggested.
| + | |
| − | | + | |
| − | ===Grouphead Cleaning===
| + | |
| − | | + | |
| − | On a daily basis the shower screen and group gasket should be wiped down and any visible grounds/dirt should be removed.
| + | |
| − | | + | |
| − | On a monthly the shower screen and gasket should be removed, and the grouphead cleaned on a monthly basis. Take extra care in cleaning the grouphead thoroughly, brush the grouphead down with a grouphead cleaning brush, and soak the shower screen in a solution of hot water and backflushing powder. Rinse off any buildup on the group gasket with plain water.
| + | |
| − | | + | |
| − | ===Steam Wand Cleaning===
| + | |
| − | | + | |
| − | Steam wands, steam tips, and nozzle attachments should be cleaned daily after the machine is finished being used for the day. Milk residues quickly build up on steam wands and frothing nozzles, so it is important to keep these clean to prevent blockages from forming.
| + | |
| − | | + | |
| − | ===Replacing Group Gasket===
| + | |
| − | | + | |
| − | The group gasket will typically need to be replaced about every six months to a year. It is not necessary to replace the gasket until leaking at the grouphead occurs, but it is good to have a gasket on hand since the machine cannot be used with a broken gasket. The shower screen should also be cleaned and inspected at this time. If there is considerable scale/coffee buildup or wear it should also be replaced.
| + | |
| − | | + | |
| − | ===Water Softener===
| + | |
| − | | + | |
| − | Because this machine should only be descaled professionally we recommend a filtration system, such as a [https://www.wholelattelove.com/products/bwt-bestmax-premium-filter-package BWT Inline Filter], be installed on the unit to prevent scale buildup. The machine does have a basic debris filter, but this will not soften the water or prevent scale buildup in any way. DO NOT use distilled, reverse osmosis, or zero water in this machine. It will cause sensors in the machine to malfunction and can be potentially damaging to metal components. {{#ev:youtube|https://www.youtube.com/watch?v=xLdQ66iaXAQ|480|center}}
| + | |
| − | | + | |
| − | ===Recommended Cleaning Products===
| + | |
| − | | + | |
| − | The best product for cleaning grouphead components, and cleaning filter baskets is a backflushing powder like [https://www.wholelattelove.com/products/urnex-cafiza-espresso-machine-cleaner Urnex Cafiza]. Again, this machine should not be backflushed, and this cleaning agent is for the purpose of cleaning removable metal components only.
| + | |
| − | | + | |
| − | | + | |
| − | == Troubleshooting ==
| + | |
| − | ===No Crema or Bad Tasting Shots===
| + | |
| − | | + | |
| − | {{Troubleshooting-No-Crema-Bad-Shots}}
| + | |
| − | | + | |
| − | | + | |
| − | ===Difficulty Frothing===
| + | |
| − | | + | |
| − | {{Troubleshooting-Frothing}}
| + | |
| − | | + | |
| − | | + | |
| − | ===Flow Issues===
| + | |
| − | | + | |
| − | The first place to start with any flow issue is cleaning the machine. Before going through these steps please make sure the machine is cleaned according to the [[#Cleaning & Maintenance|Cleaning & Maintenance]] section of this article.
| + | |
| − | | + | |
| − | | + | |
| − | ====No Steam From Wand==== | + | |
| − | | + | |
| − | #Check the brew function on the machine and see if water is able to flow through the machine for this function.
| + | |
| − | ##If the brew water is not flowing either refer to the [[#No Flow At All|No Flow At All]] section of this article
| + | |
| − | ##If the brew water flows but is not hot refer to the [[#On But Not Heating|On But Not Heating]] section of this article.
| + | |
| − | #Check the hot water function of the machine. If you are able to draw hot water then the steam boiler must be pressurizing and heating, because hot water is expelled from the machine by steam pressure.
| + | |
| − | ##Remove the tip from the steam wand and test the flow. If flow is restored then the tip needs to be cleaned and reattached.
| + | |
| − | ##If the flow is still blocked then there may be a blockage in the steam wand itself. Clean the wand by using a pipe brush that has synthetic or plastic bristles; metal bristles can damage the wand. Then soak the wand in a solution of hot water and backflushing powder for ten minutes. Test flow again.
| + | |
| − | ##If there still isn't flow then there may be a blockage farther back in the steam circuit. The machine may need to be professionally cleaned to remove the blockage.
| + | |
| − | #If the machine is spewing a lot of steam from the top as it is heating up then the vacuum relief valve may be stuck open. This valve is supposed to close once the machine produces enough steam pressure.
| + | |
| − | ##Unplug the machine and make sure it is cooled down. Remove the cover of the machine.
| + | |
| − | ##Once the cover is removed the top of the vacuum relief valve will need to be removed. The vacuum relief valve is on top of the boiler. [[File:PRO_800_Vacuum_Relief_Valve.jpg|200px|thumbnail|center|The vacuum relief is circled in red.]] Because the vacuum relief valve is thread bonded into the boiler it will be easier to just remove the top of the valve, like shown in the photo below. This can be done with a socket wrench, or an open ended wrench. The relief valve will have two nuts, a thicker nut on top and a thinner nut on the bottom. Unscrew the thicker top nut. [[File:PRO 500 Vacuum Relief Top Removed.jpg|200px|thumbnail|center|Relief valve with top removed.]]
| + | |
| − | ##You will be able to access the internal valve components now. The separate valve components will look like this: [[File:PRO 500 Vacuum Relief Parts Blowout.jpg|200px|thumbnail|center|Vacuum Relief Parts]]
| + | |
| − | ##:The video below discusses what these valve components do and how to clean them. {{#ev:youtube|https://www.youtube.com/watch?v=L9P0t7__9ZM|480|center|||start=137}}
| + | |
| − | #The high limit switch may be tripped. The high limit switch is an internal killswitch which prevents damage to the machine caused by power surges or the machine overheating.
| + | |
| − | ##Unplug the machine and make sure it is cooled down. Remove the cover of the machine.
| + | |
| − | ##Once the cover is removed look at the left hand side of the machine and you will find the electrical connections for the boiler. The high limit switches are the two white cylinders with the black push button in the center. [[File:PRO 800 High Limit Reset.jpg|200px|thumbnail|center|The high-limit resets are circled in red.]]
| + | |
| − | ##Reset the switches by pressing on the button on each switch several times. The switch will not click or signal it has been reset, but the act of pressing it several times will reset it.
| + | |
| − | | + | |
| − | ====Poor Or No Flow From Grouphead====
| + | |
| − | | + | |
| − | If there is little to no flow from the grouphead then it will need to be taken apart for cleaning.
| + | |
| − | | + | |
| − | #Use a flathead screwdriver to pull the shower screen down and off the machine. Looking at the grouphead from below there will be a lip on the shower screen. Gently pry on this lip with the screwdriver from different angles until the shower screen comes off. The group gasket may come off with the screen.
| + | |
| − | #Use a grouphead brush or an old tooth brush to clean brush down any dirt or coffee residues from the grouphead. Dipping the brush in a solution of hot water and backflushing powder will assist in removing residues.
| + | |
| − | #Soak the shower screen and filter baskets in a solution of hot water and cafiza. Rinse of the gasket with plain water to remove and grinds or coffee buildup.
| + | |
| − | #If this does not solve the flow issue then the machine will require professional service.
| + | |
| − | | + | |
| − | ====No Hot Water From Tap====
| + | |
| − | | + | |
| − | #Check the brew function on the machine and see if water is able to flow through the machine for this function.
| + | |
| − | ##If the brew water is not flowing either refer to the [[#No Flow At All|No Flow At All]] section of this article
| + | |
| − | ##If the brew water flows but is not hot refer to the [[#On But Not Heating|On But Not Heating]] section of this article.
| + | |
| − | #Check the steam function of the machine. If you are able to draw steam then the boiler must be pressurizing and heating, because hot water is expelled from the machine by steam pressure.
| + | |
| − | ##Remove the tip from the hot water wand and test the flow. If flow is restored then the tip needs to be cleaned and reattached.
| + | |
| − | ##If the flow is still blocked then there may be a blockage in the hot water wand itself. Clean the wand by using a pipe brush that has synthetic or plastic bristles; metal bristles can damage the wand. Then soak the wand in a solution of hot water and backflushing powder for ten minutes. Test flow again.
| + | |
| − | ##If there still isn't flow then there may be a blockage farther back in the hot water circuit. The machine may need to be professionally cleaned to remove the blockage.
| + | |
| − | #If the machine is spewing a lot of steam from the top as it is heating up then the vacuum relief valve may be stuck open. This valve is supposed to close once the machine produces enough steam pressure.
| + | |
| − | ##Unplug the machine and make sure it is cooled down. Remove the cover of the machine.
| + | |
| − | ##Once the cover is removed the top of the vacuum relief valve will need to be removed. The vacuum relief valve is on top of the boiler. [[File:PRO_800_Vacuum_Relief_Valve.jpg|200px|thumbnail|center|The vacuum relief is circled in red.]] Because the vacuum relief valve is thread bonded into the boiler it will be easier to just remove the top of the valve, like shown in the photo below. This can be done with a socket wrench, or an open ended wrench. The relief valve will have two nuts, a thicker nut on top and a thinner nut on the bottom. Unscrew the thicker top nut. [[File:PRO 500 Vacuum Relief Top Removed.jpg|200px|thumbnail|center|Relief valve with top removed.]]
| + | |
| − | ##You will be able to access the internal valve components now. The separate valve components will look like this: [[File:PRO 500 Vacuum Relief Parts Blowout.jpg|200px|thumbnail|center|Vacuum Relief Parts]]
| + | |
| − | ##:The video below discusses what these valve components do and how to clean them. {{#ev:youtube|https://www.youtube.com/watch?v=L9P0t7__9ZM|480|center|||start=137}}
| + | |
| − | #The high limit switch may be tripped. The high limit switch is an internal killswitch which prevents damage to the machine caused by power surges or the machine overheating.
| + | |
| − | ##Unplug the machine and make sure it is cooled down. Remove the cover of the machine.
| + | |
| − | ##Once the cover is removed look at the left hand side of the machine and you will find the electrical connections for the boiler. The high limit switches are the two white cylinders with the black push button in the center. [[File:PRO 800 High Limit Reset.jpg|200px|thumbnail|center|The high-limit resets are circled in red.]]
| + | |
| − | ##Reset the switches by pressing on the button on each switch several times. The switch will not click or signal it has been reset, but the act of pressing it several times will reset it.
| + | |
| − | | + | |
| − | ====No Flow At All====
| + | |
| − | | + | |
| − | If the machine is set to the plumbed mode:
| + | |
| − | | + | |
| − | #First try switching to reservoir mode temporarily and see if this resolves the issue. If it does, then the issue is limited to the plumb line and you should go to the next step. Otherwise keep the machine in reservoir mode and skip down to the next section which deals with testing no flow in reservoir mode.
| + | |
| − | #Return the machine to plumb mode. The next thing to check is to see if we can isolate where the flow issue is occurring for the plumb line. Try putting the plumb line hosing into an external bucket or container filled with water and see if the machine will draw water from this source. If it can't then there may bea blockage somewhere in the plumb line itself.
| + | |
| − | #If you are able to draw water from the plumb line, then there may be an issue with the plumbing supplying this line.
| + | |
| − | | + | |
| − | If the machine is set to use the reservoir:
| + | |
| − | | + | |
| − | #If the pump does not sound like it is activating:
| + | |
| − | ##Check to make sure the water tank is filled and the machine isn't indicating that the water tank is empty.
| + | |
| − | ###If the tank is empty refill it.
| + | |
| − | ###If the tank is full, but the machine thinks the water tank is empty then the tank may not be seated correctly. Make sure there isn't anything blocked the tank from sitting flush inside the machine. Use of R/O, distilled, and zero waters will cause this sensor to malfunction, resulting in the machine thinking there is no water causing the pump not to activate.
| + | |
| − | ##Remove the cover of the machine and check for any loose or disconnected wires.
| + | |
| − | ##There may be an issue with the water tank sensor.
| + | |
| − | ###Remove the drip tray from the front and make sure the plumb switch is turned off.
| + | |
| − | ###Remove the reservoir and make sure the float magnet is facing the sensor. Magnet on the float should be facing the back left corner of the tank.
| + | |
| − | ###Check to make srue the wire for the water level sensor isn't loose/disconnected.
| + | |
| − | ##There may be an issue with the pump powering on. Check to make sure the pump doesn't have any loose/disconnected wires.
| + | |
| − | #If the pump does sound like it is activating make sure the plumb valve and the plumb switch are both set in the correct position. If they are set in opposite positions then the pump will activate, but water won't be able to come through the machine.
| + | |
| − | | + | |
| − | | + | |
| − | | + | |
| − | ===Machine Is Leaking===
| + | |
| − | | + | |
| − | ====Between Portafilter & Grouphead====
| + | |
| − | If the grouphead leaks from the space in between the portafilter and the grouphead during brewing then the group gasket is either worn out or out of place. This gasket needs to be replaced typically every six months to a year.
| + | |
| − | | + | |
| − | #Use a flathead screwdriver to pull the shower screen down and off the machine. Looking at the grouphead from below there will be a lip on the shower screen. Gently pry on this lip with the screwdriver from different angles until the shower screen comes off. The group gasket may come off with the screen.
| + | |
| − | #Use a grouphead brush or an old tooth brush to clean brush down any dirt or coffee residues from the grouphead. Dipping the brush in a solution of hot water and backflushing powder will assist in removing residues.
| + | |
| − | #Soak the shower screen and filter baskets in a solution of hot water and cafiza.
| + | |
| − | #Once everything is clean insert the shower screen into the group gasket securely.
| + | |
| − | #Press both the shower screen and gasket into the grouphead together. Then attach the portafilter firmly to secure these components into place.
| + | |
| − | | + | |
| − | {{Troubleshooting-Prosumer-Bottom-Leak
| + | |
| − | |plumbed = Yes
| + | |
| − | |water_source = Reservoir
| + | |
| − | |level_probe_instr = The water level probe can be cleaned by removing it from the boiler. First make sure the machine is unplugged and fully cooled off. The level probe is located on top of the boiler; it has a red wire which is attached to it.
| + | |
| − | ####The probe is secured to the boiler by a two bolt assembly. Use an open ended wrench or adjustable wrench to loosen the smaller upper bolt. Once this nut is loosened the probe should be able to slide out.
| + | |
| − | ####Once the probe is removed clean it off. Soak the probe in a solution of hot water and backflushing powder.
| + | |
| − | ####If the probe has a large amount of scale buildup on it a scrubby sponge can be used to remove the scale buildup. Do not use a metal scrubber as it can damage the probe.
| + | |
| − | ####Also examine the wiring of the probe to make sure it is intact and is attached to the power board of the machine.
| + | |
| | }} | | }} |
| − |
| + | ---- |
| − | {{Troubleshooting-Prosumer-Top-Steaming | + | ===Steam Tip Compatibility=== |
| − | |vacuum_cleaning_instr = ###Unplug the machine and make sure it is cooled down. Remove the cover of the machine. | + | {{Content-Columns |
| − | ###Once the cover is removed the top of the vacuum relief valve will need to be removed. The vacuum relief valve is on top of the boiler. [[File:PRO_800_Vacuum_Relief_Valve.jpg|200px|thumbnail|center|The vacuum relief is circled in red.]] Because the vacuum relief valve is thread bonded into the boiler it will be easier to just remove the top of the valve, like shown in the photo below. This can be done with a socket wrench, or an open ended wrench. The relief valve will have two nuts, a thicker nut on top and a thinner nut on the bottom. Unscrew the thicker top nut. [[File:PRO 500 Vacuum Relief Top Removed.jpg|200px|thumbnail|center|Relief valve with top removed.]]
| + | |column_1 = |
| − | ###You will be able to access the internal valve components now. The separate valve components will look like this: [[File:PRO 500 Vacuum Relief Parts Blowout.jpg|200px|thumbnail|center|Vacuum Relief Parts]]
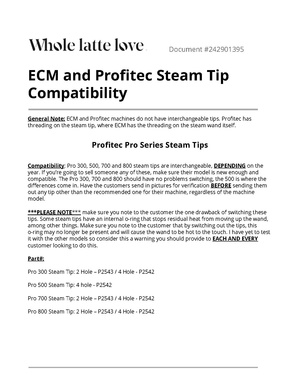
| + | : There are several different steam tips for ECM and its sister brand Profitec, some of which are interchangeable and others not. Consult this comprehensive document on the topic for more information. |
| − | ###:The video below discusses what these valve components do and how to clean them. {{#ev:youtube|https://www.youtube.com/watch?v=L9P0t7__9ZM|480|center|||start=137}}
| + | |column_2 = |
| − | |steam_adjust_style = PID
| + | [[File:ECM_and_Profitec_Steam_Tip_Compatibility.pdf|center|link=https://wiki.wholelattelove.com/File:ECM_and_Profitec_Steam_Tip_Compatibility.pdf]] |
| | + | |media_caption = |
| | + | Steam Tip Compatibility |
| | }} | | }} |
| | | | |
| − | {{Troubleshooting-Prosumer-Wand-Leak
| |
| − | |knob_instr = Instructions for taking apart the knob assembly can be found in the video below: {{#ev:youtube|https://www.youtube.com/watch?v=4WdlV1pCtaA|480|center}}
| |
| − | ##There is also a seal in the steam valve that may be worn or dirty and is letting water through. The seal may need to be replaced, or it can also be flipped over and reused. The video below explains: {{#ev:youtube|https://www.youtube.com/watch?v=kiFw0SV24S8|480|center|||start=1012}}
| |
| − | |tip_instr = <br />
| |
| − | ##The steam tip o-ring is easy to access. Simply unscrew the steam tip and there will be a small o-ring between the tip the wand arm. Inspect this o-ring for damage and clean it.
| |
| − | ##The hot water tip is a little more complicated, but still easily accessed and cleaned.
| |
| − | ###First unscrew the tip assembly from the wand arm.
| |
| − | ###There will be an o-ring between the tip assembly and the wand arm. If the leaking was coming from here, then this o-ring needs to be cleaned and repositioned, or if it is damaged it will need to be replaced. [[File:PRO_700_Hot_Water_Tip_Removed.jpg|200px|thumbnail|center|The red arrow points to the o-ring for the hot water tip.]]
| |
| − | ###If the leaking was coming from farther down on the tip, then the tip will need to be disassembled further to troubleshoot. To disassemble the tip further simply twist the two halves of the tip assembly in opposite directions. Alternatively you can screw the tip back onto the machine and then just unscrew the bottom half of the tip; this will give you a better grip on the tip to unscrew the two halves. [[File:PRO_700_Hot_Water_Tip_End_Removed.jpg|400px|thumbnail|center]]
| |
| − | ###Once the tip is apart it will separate into three separate pieces. There will be three metal pieces and another o-ring. Inspect the o-ring for cleanliness and damage. The metal pieces can be soaked in a solution of hot water and backflushing powder to remove any scale buildup on them. [[File:PRO_700_Hot_Water_Tip_Parts.jpg|400px|thumbnail|center|The disassembled hot water tip.]]
| |
| − | |ball_joint_instr = <br />
| |
| − | ##These instructions apply to both the steam and hot water wands. First remove the wand arm. This can be done by unscrewing the hex shaped nut at the top of the arm. Please note that this assembly is reverse threaded, so you will need to turn the nut clockwise to loosen it. [[File:PRO 700 Ball Joint Nut.jpg|400px|thumbnail|center|Ball Joint Securing Nut]]
| |
| − | ##Once the wand is removed you may have parts stick to the valve assembly. Do not lose these parts. [[File:PRO_700_Wand_Removed.jpg|400px|thumbnail|center|The tension spring may be stuck in the steam valve like the picture shows.]]
| |
| − | ##If the leaking was coming from the top of the securing nut, check the white teflon o-ring to make sure it is in clean and in good condition. [[File:PRO 700 Ball Joint O-ring.jpg|400px|thumbnail|center|The red arrow points to the teflon o-ring.]]
| |
| − | ##Inspect the tension spring to make sure it is in good condition. The spring should be really firm. If it is easily compressed then it may need to be replaced. The bottom of the spring will have a metal gasket, which helps the wand pivot on the spring Make sure these parts are clean and reinstall them. [[File:PRO_700_Ball_Joint_Blowout.jpg|400px|thumbnail|center|Parts of the wand ball joint. The metal gasket is pictured in the center, and inserts into the bottom of the spring.]]
| |
| − | |valve_attach_instr = These instructions apply to both the steam and hot water valve assemblies.
| |
| − | ##You will need two open ended wrenches, or adjustable wrenches to tighten this assembly down.
| |
| − | ##First remove the top panel and covering of the machine. Put one of the wrenches on the bolt pictured below. The bolt will be towards the front of the machine, opposite to where the valve assembly attaches to the faceplate.[[File:PRO_700_Internal_Valve_Bolt.jpg|400px|thumbnail|center]]
| |
| − | ##Place the other wrench on the square shaped steam valve on the front of the machine. Keep this wrench stationary, and then turn the other wrench to tighten the bolt down.
| |
| − | }}
| |
| − |
| |
| − | ===Machine Not Heating Or Powering On===
| |
| − |
| |
| − | {{Troubleshooting-Prosumer-No-Power}}
| |
| − |
| |
| − | ====Brew Or Steam Not Hot Enough====
| |
| − |
| |
| − | You can use the instructions in the section of this article that describes how [[#Adjusting The PID|adjust the PID]] to raise the set temperature of the boiler. Raising the temperature too far puts the boiler at risk of over-pressurizing, which will cause the relief valve to open and vent steam from the top of the machine. If the steam pressure gauge moves past 1.2 bar then the temperature will need to be lowered. Since this is a single boiler machine steam and brew temperatures are interrelated, raising one raises the other.
| |
| − |
| |
| − | {{Troubleshooting-Prosumer-No-Heat
| |
| − | |tank_instructions = <br />
| |
| − | ##If the tank is empty refill it.
| |
| − | ##If the tank is full, but the machine thinks the water tank is empty then the tank may not be seated correctly. Make sure there isn't anything blocked the tank from sitting flush inside the machine. Use of R/O, distilled, and zero waters will cause this sensor to malfunction, resulting in the machine thinking there is no water causing the pump not to activate.
| |
| − | |hls_reset_instr = <br />
| |
| − | ##Unplug the machine and make sure it is cooled down. Remove the cover of the machine.
| |
| − | ##Once the cover is removed look at the left hand side of the machine and you will find the electrical connections for the boiler. The high limit switches are the two white cylinders with the black push button in the center. [[File:PRO 800 High Limit Reset.jpg|200px|thumbnail|center|The high-limit resets are circled in red.]]
| |
| − | ##Reset the switches by pressing on the button on each switch several times. The switch will not click or signal it has been reset, but the act of pressing it several times will reset it.
| |
| − | }}
| |
| − |
| |
| − | ===Portafilter Handle Not Fitting On Machine===
| |
| − |
| |
| − | {{Troubleshooting-Prosumer-Portafilter}}
| |
| − |
| |
| − | ==Diagrams & Manuals==
| |
| − |
| |
| − | {{Support-Documents
| |
| − | |title = Profitec Pro 800
| |
| − | |machine_manual = [[File:PROFITEC PRO 800 Machine Manual.pdf|150px|none]]
| |
| − | }}
| |
| − |
| |
| − | ==Specifications==
| |
| − |
| |
| − | {{Specifications-Prosumer
| |
| − | |basic_specs = Yes
| |
| − | |width = 16.53 in.
| |
| − | |height = 28.74 in.
| |
| − | |depth = 22.83 in.
| |
| − | |weight = 78.26 lbs
| |
| − | |watts = 1500
| |
| − | |volts = 115
| |
| − |
| |
| − | |housing = Yes
| |
| − | |housing_material = Stainless Steel
| |
| − | |drip_tray_material = Stainless Steel
| |
| − | |drip_tray_cover_material = Stainless Steel
| |
| − | |drip_tray_capacity = 1 L.
| |
| − | |drain_line_adaptable = Yes
| |
| − |
| |
| − | |frothing = Yes
| |
| − | |wand_material = Stainless Steel
| |
| − | |wand_style = Commercial
| |
| − | |wand_movement = Articulating
| |
| − | |number_of_holes = 4
| |
| − | |no_burn_wand = Yes
| |
| − |
| |
| − | |water_source = Yes
| |
| − | |source_type = Both
| |
| − | |reservoir_capacity = 101 oz. / 3 L.
| |
| − | |reservoir_material = Plastic
| |
| − | |reservoir_removable = Yes
| |
| − |
| |
| − | |controls = Yes
| |
| − | |control_type = PID
| |
| − | |display_type = Gicar LED
| |
| − | |temp_control = Yes
| |
| − | |pre_infusion = Yes
| |
| − | |pressure_gauges = Steam
| |
| − | |brew_temp_display = No
| |
| − |
| |
| − | |cup_warmer = Yes
| |
| − | |warmer_material = Stainless Steel
| |
| − | |warmer_type = Passive
| |
| − |
| |
| − | |portafilter = Yes
| |
| − | |portafilter_material = Chrome Plated Brass
| |
| − | |portafilter_type = Commercial Style
| |
| − | |quantity_included = 3
| |
| − | |portafilter_diameter = 58 mm.
| |
| − | |commercial_baskets = Single, Double, Triple
| |
| − | |bottomless_portafilter = Included
| |
| − | |tamper_size = 58 mm.
| |
| − |
| |
| − | |brew_group = Yes
| |
| − | |group_type = Lever Operated
| |
| − | |preheat = Yes
| |
| − | |solenoid = No
| |
| − | |back_flushable = No
| |
| − |
| |
| − | |boiler_data = Yes
| |
| − | |num_boilers = 1
| |
| − | |brew_steam_simultaneous = Yes
| |
| − |
| |
| − | |brew_boiler = Yes
| |
| − | |brew_boiler_wattage = 1500
| |
| − | |brew_boiler_volume = 118 oz. / 3.5 L.
| |
| − | |brew_boiler_material = Copper
| |
| − | |brew_boiler_orientation = Horizontal
| |
| − | |brew_element_location = Side
| |
| − | |brew_boiler_autofill = Yes
| |
| − | |brew_boiler_insulated = Yes
| |
| − |
| |
| − | |pump_data = Yes
| |
| − | |pump_type = Ulka Vibration Pump
| |
| − | |pump_pressure = 15
| |
| − | |pump_pressure_adjust = N/A
| |
| − |
| |
| − | |details = Yes
| |
| − | |manufacture_country = Germany
| |
| − | |recommended_application = Home Use
| |
| − | }}
| |
| − |
| |
| − | <!-- Categories -->
| |
| − | [[Category:Prosumers]]
| |
| | [[Category:Profitec]] | | [[Category:Profitec]] |