Saeco Xelsis EVO
From Whole Latte Love Support Library
Revision as of 13:00, 29 April 2016 by Giordo (Talk | contribs) (Created page with "The Saeco Xelsis EVO is a super-automatic espresso machine that features beverage programming and an auto-frothing carafe. {{Description-Table |...")
The Saeco Xelsis EVO is a super-automatic espresso machine that features beverage programming and an auto-frothing carafe.
| Saeco Xelsis |
|---|
 |
| Manufacturer: Saeco |
| Model Name: Xelsis EVO |
| Model Number: HD8954/47 |
| Type: Super-Automatic |
 |
Contents
- 1 Machine Description
- 2 Basic Usage
- 3 Cleaning & Maintenance
- 4 Troubleshooting
- 4.1 No Crema or Bad Tasting Shots
- 4.2 Difficulty Frothing
- 4.3 Flow Issues
- 4.4 Machine Is Leaking
- 4.5 Machine Not Heating Or Powering On
- 4.6 No Beans, Grinder Blocked, Or E01
- 4.7 Continuous Empty Grounds Error
- 4.8 Brew Unit Max Pressure, Stuck, or E03 or E04 Error Codes
- 4.9 Too Much Steam/Milk Boiling
- 5 Diagrams & Manuals
- 6 Specifications
Machine Description
This updated version of Saeco’s original Xelsis espresso machine includes all of the same features boasted by the original, along with upgrades to the frothing system and drip tray. With its Multi-Function and Multi-User settings, the Xelsis EVO can be programmed to cater to the specific drink preferences of up to six different users. Each user profile allows for programming drink volume, temperature and strength settings for truly customized beverages on demand.
A dial, located on the front of the machine, allows you to control the Saeco Brewing System. With this unique system, you can select the strength and consistency of your coffee to achieve the desired beverage. The Xelsis Evo is backed by a powerful 1500-watt heating element or robust brewing operations. In addition, this model has double boilers, one for steaming and another for hot water dispensing.
The Xelsis EVO features the same H2 Technology milk carafe used by the Exprelia EVO. This dual chambered milk carafe is capable of creating rich, creamy froth perfect for lattes, cappuccinos, and macchiatos. The carafe locks into the front of the machine for instant steaming and frothing. As with most high-end Saeco super-automatic machines, the Xelsis EVO comes equipped with a number of user-friendly features including: the Saeco Brewing and Aroma Systems, a ceramic disc grinder, removable water reservoir with Intenza filter, and automated cleaning cycles. The Xelsis EVO also has a touch-screen interface that makes programming intuitive and hassle-free.
The Xelsis Evo has a removable 54oz water tank with an Intenza water filter. Along with the bean hopper, the water tank is easily accessible from the top of the machine for hassle-free cleaning and refilling. The brew group is accessible from the front and can be detached for easy rinsing and maintenance. You can remove both the group and grounds container without disturbing the drip tray or milk carafe.
The integrated heavy-duty ceramic disc grinder allows for precision grinding. The ceramic discs, or burrs, have the advantage of being more durable than their stainless steel counterparts; you’ll also be able to achieve a finer grind. This remarkably quiet grinder has an automatic shut-off feature and the grind fineness can be easily adjusted by the user. In addition, the Xelsis Evo has a bean hopper, equipped with an airtight-sealed, anti-UV coated lid, to preserve your beans. A bypass doser gives you the option of skipping grinder in favor of pre-ground coffee.
Basic Usage
Getting Started
Bypass Doser
If you plan on using the bypass doser function on the machine to brew with pre-ground coffee there are a few things to consider for the best brewing experience:
- The bypass doser will only accept 8-9 grams of coffee at a time. The scoop that comes with the machine is merely for transferring coffee grinds, it is not a measurement tool. To prevent overfilling the bypass doser we suggest using a level scoop, and then taking a large pinch out of it. A little bit less than a full scoop is the perfect amount.
- If the coffee is ground too coarsely the resulting shot is going to taste sour, weak or watery. Coffee ground for espresso should be slightly finer than table sugar or sand.
- Alternatively it is also possible to have coffee that is ground too fine. Extremely fine grinds can result in little or no flow from the machine, and very bitter shots. Coffee that is ground too finely can cause blockages in the system that can only be resolved through deep cleaning or a repair.
Do not add whole beans, or entire bags of preground coffee into this chamber. It will cause irreversible damage to the machine.
Cleaning & Maintenance
Proper machine maintenance is critical for machine function. Most machine failures are caused by lack of cleaning and many manufacturer warranties do not cover cleaning related breakdowns, so it is important to keep a regular maintenance schedule. Listed below is a suggested maintenance schedule for most super-automatic espresso machines:
Machine Maintenance
Descaling
Descaling the machine should be done on a bimonthly basis using the product recommended by the manufacturer. Descaling is still required even if reverse osmosis, distilled, or zero water is being used. Refer to your machine manual for specific instructions for this unit.
Brew Unit
The brew unit of the machine should be removed on a weekly basis and rinsed of with cold water. Cold water must be used because the brew unit has lubrication on it that will wash away with hot water. It is also important to use plain water, detergents and soaps should not be used. While the brew unit is removed the brew unit chamber should be wiped down with a moist cloth to remove excess grounds and coffee residues.
Your machine features a brew unit cleaning cycle. This should be done on a monthly basis; refer to your manual for instructions on how to run one.
A complete disassembly, cleaning, and lubrication of the brew unit should be done every 500 cups or every 6 months, whichever comes first. A food safe silicon based lubricant should be used, such as food grade Petrol-Gel.
Steam Wand Cleaning
Steam wands and nozzle attachments should be cleaned daily after the machine is finished being used for the day. Milk residues quickly build up on steam wands and frothing nozzles, so it is important to keep these clean to prevent blockages from forming.
Recommended Cleaning Products
Milk Carafe Maintenance
Automatic Cleaning Cycle
The automatic carafe cleaning cycle for this machine should be completed on a weekly basis. It is important to keep the carafe clean in order for the carafe to function properly and to be able to produce froth. Unsanitary milk residues can build up in the carafe if it is not maintained properly. The automatic carafe cleaning cycle is simply activated by pressing the clean button on the touch display.
Manual Disassembly & Cleaning
While the automatic cleaning cycle does remove most residues it is not a complete cleaning of the carafe. The carafe should be pulled apart on a daily basis, after you are finished making latte drinks for the day, for more thorough cleaning.
Recommended Cleaning Products
The automated carafe cleaning cycle requires the use of a cleaning solution intended for removing milk residues. The recommended product for this unit is .
Troubleshooting
No Crema or Bad Tasting Shots
Typically, issues with crema or the flavor of the shot do not indicate a malfunction of the machine. Instead, this indicates that an adjustment needs to be made in the brewing process or that different beans need to be used.
The type of bean that is being used is particularly important for super-automatic machines, because the built in burr grinders only accept certain types of beans. Another consideration is the roast of the bean, which greatly influences how much crema can be produced, as well as the flavor of the shot. Super-automatic machines are not compatible with oily, caramelized, or flavored beans. Properly stored and recently roasted beans are best. You can find more information on why bean selection and storage is important for super-automatic machines by watching the video below.
5 Things New Super Automatic Espresso Machine Owners Should Know
Appropriately adjusting the grinder is also important. Poor shots can also be the result of incorrect grind settings.
- If the shot is too bitter:
- The grind is set too fine. Try adjusting the grind to a coarser setting, typically indicated by a large dot symbol or higher number.
- If applicable, the aroma setting is set too high. Lower the aroma setting so that less coffee is ground per shot.
- The beans being used are over-roasted, and a lighter roast is needed.
- If the shot is too sour or weak tasting:
- The grind is set too coarse. Try adjusting the grind to a finer setting, indicated by a lower number. Whenever moving the grind to a finer setting it is important to make minor adjustments, and to only adjust the grinder while in operation.
- If there is little crema:
- The beans are probably stale and fresher beans need to be used.
- The grind setting does not match the drink that is being made. Smaller drinks such as an espresso require finer grind size; larger drinks such as a longo require a coarser grind.
- Oily or dark roasted beans are being used. These beans are not compatible with the unit, and are not suitable for espresso brewing. The oils and chemicals that are needed to produce a rich crema have been roasted out of the bean. Switch to a drier/lighter roast.
- Keep the machine properly cleaned and maintained for good tasting shots. Your grinder may need to be cleaned or calibrated, or you may need to descale your machine to remove any unwanted residues or flavors.
Difficulty Frothing
Wand Frothing Issues
If the machine has little to no steam flow through the steam wand, first check to make sure there are no blockages in the steam wand. Otherwise, an adjustment to frothing technique needs to be made. When manually frothing, technique is key. Tight microfoam will not be accomplished if the proper technique is not followed.
The following video shows how to properly froth with a manual style wand:
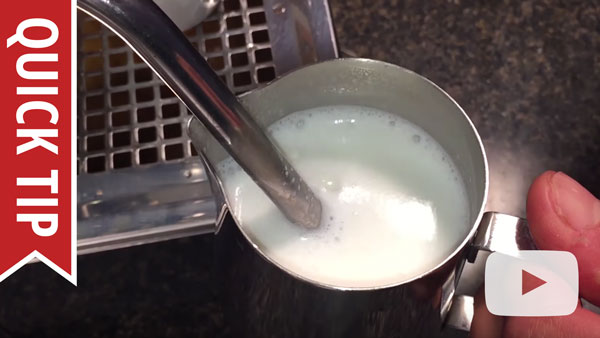
How to Froth and Steam Milk for Latte Art, Cappuccino and More
There are also some common mistakes made when manually frothing that should be avoided. The video below gives further details:

Quick Tip: Six Common Milk Frothing Mistakes
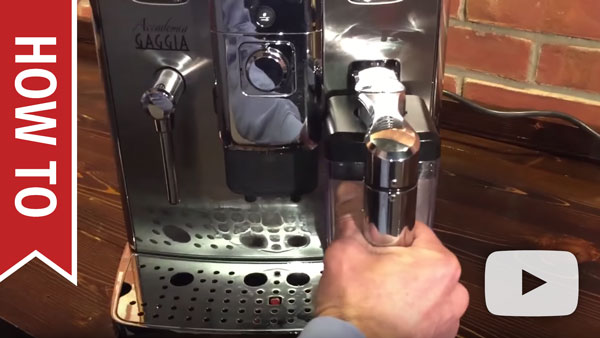
Carafe Frothing Issues
Before going through the following steps make sure to try all of the recommended Milk Carafe Maintenance steps have been done.
- If there is nothing coming out of the carafe at all:
- Check the carafe to make sure it is securely attached to the machine and that the machine recognizes the carafe is in place. To ensure this, you can remove the carafe and re-insert it.
- Make sure the carafe is properly assembled. Inspect the parts to make sure none of them appear broken, damaged, or missing. There is a diagram of the carafe disassembly on pp.43-45 of the machine manual. here.
- The machine may not be producing steam because of a thermostat issue. If the machine gives an E15 error code, or it gets stuck heating up the steam circuit, then the machine will need to be repaired.
- If the carafe is spitting or not producing foam:
- The machine is set to a low froth setting. Check the machine settings to make sure it is set to the maximum froth. There is also a milk setting, which should also be set to max. Press the list icon, followed by the check to enter the Beverage Menu. From there, you can select your different drink options and adjust their specific qualities. Milk Amount is listed here.
- A non-compatible milk is being used. The machine is designed for use with whole or 2% milk, so the best results will be achieved by using these varieties.
- Make sure the carafe is properly assembled.Inspect the parts to make sure none of them appear broken, damaged, or missing. There is a diagram of the carafe disassembly on pp.50-51 of the machine manual.
How To Manually Clean a Gaggia Accademia Milk Carafe
Flow Issues
The first place to start with any flow issue is cleaning the machine. Before going through these steps please make sure the machine is cleaned according to the Cleaning & Maintenance section of this article.
Poor Or No Flow Or E05 Error
If you are not able to get water to flow through the machine at all, or if the machine displays an E05 code, then something is blocking water flow through the machine. This issue typically indicates the machine is not being cleaned on a regular basis. Review the cleaning & maintenance rundown for this machine, and make sure maintenance is done at least as often as is suggested with the recommended product. Once flow is restored, even if it is minimal flow, a descaling should be done immediately.
- The water tank is not seating properly. Please remove the tank and reinsert it firmly. Make sure there are no beans or debris beneath the water tank preventing it from seating flush with the machine.
- If you are using an Intenza water filter in the machine then it might be blocking the flow of water. Try removing the water filter and using the machine without it. If the machine works without the water filter, then the filter was blocking the flow of water. Keep the filter out of the machine for the remaining steps.
- Debris has been drawn into the system from the water tank. This kind of debris can get lodged in valves/water circuits and cause flow issues.
- Try cleaning the brew unit check valve using the instructions here.
- If you have been able to restore some flow to the brew circuit, a brew unit cleaning cycle should be completed. The process can be found on pp. 49 of the machine manual.
- The machine may require a manual prime.
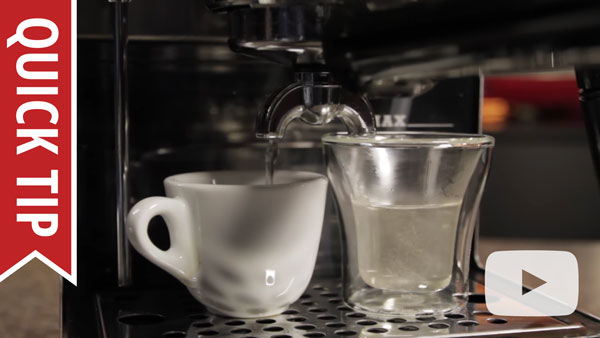
No Flow From Steam Wand
Once the flow issue has been resolved the machine should be immediately descaled with the recommended product. Flow issues and blockages are typically due to lack of maintenance or excessive scale buildup.
- First set the machine to hot water mode. If the machine has a pannarello or turbo-frothing attachment on the wand remove it for the remaining steps.
- If the machine displays an E15 error code, or the machine gets stuck on the heating up screen, then there is a thermostat issue and the machine will need to be repaired.
- You should hear the pump start to vibrate. Once the pump is activated, hot water should begin to flow through the wand, however:
- If hot water flows through the wand, stop the machine from dispensing hot water and switch to steam mode. There may have been a piece of debris in the steam wand blocking the flow.
- If water does not flow through the wand then there may be a more severe blockage.
- Soak the wand in a mixture of descaler and hot water. Test flow using the hot water function again.
- Use a pipe cleaner to manually clean the inside of the wand. Only use a pipe cleaner with synthetic or plastic bristles; do not use one with metal bristles as it can damage the wand. Test the flow again.
No Steam Or E15 Error
- If the carafe works, but the steam wand does not, then do the recommended steam wand cleanings.
- If the steam wand works, but the carafe does not, then do the recommended milk carafe cleanings.
- If the machine gives an E15 error or is stuck on the heating up screen, then the machine’s thermostat is damaged and will require repair.
- If temperatures are not hot enough for the carafe there are a few things to try.
- The carafe may in fact be operating properly. The carafe was designed for use with a room temperature boxed milk. The machine is programmed to produce a temperature rise of 50-70 F°. Typical ending temperatures are around 125-135 F°. However, this is completely dependent on the starting temperature of the milk being used. If the milk is stored in a very cold refrigerator (e.g. a 33 F° refrigerator) the resulting temperature will only be about 100-110 F°. For hotter milk drinks, start with warmer milk, either by leaving it out for a little bit before making your beverage, or putting the milk in the microwave for about 10 seconds prior to adding it to the milk carafe.
- There are a few programming options which can be changed in order to increase the amount of steam that is injected into the carafe during frothing. Make sure the milk drink options are programmed to the highest temperature. This will also help to set the foam and milk options to max.
Reduced Or No Flow During Brewing
- If there is no flow while brewing specifically, then something is blocked along the brew circuit. Begin by running a descale of the machine using the recommended product. Scale buildup is the most common cause of flow issues. Descaling will most likely resolve the issue.
- If the machine is set to a really fine grind, the grinds can block the flow. Set the grind to a coarser setting and see if flow is restored. Leave the grind on the coarse setting for the remainder of flow testing.
- There may be an issue with the brew unit.
- First remove the unit and rinse it off with cold water. Do not use any sort of detergent or soap to rinse it off or necessary lubricant will be removed.
- Wipe down the brew unit chamber with a damp cloth to remove any leftover grounds. A microfiber cloth is best, to prevent any cloth fibers from remaining behind.
- Clean the check-valve. Here are the instructions to follow.
- Reinsert the brew unit and test for flow.
- This machine allows beverage length to be reprogrammed. Make sure it isn't set to the minimum brew length. If the machine is programmed to the minimum beverage length the machine may not dispense any coffee, or it may only dispense a few drops. Try reprogramming the machine to a longer length drink to see if it resolves the no flow issue.
- Check the brew unit to make sure it is lining up with the spout assembly and connecting with the spout assembly properly.
- If you are noticing a lot of brewed coffee or coffee sprayed inside the brew unit chamber then the brew unit o-ring may be damaged or out of place.
- Remove the brew unit and inspect the large red o-ring attached to the tamping assembly. Make sure it is clean, properly positioned, and not damaged.
- If the o-ring is broken or damaged it should be replaced. A brew unit o-ring can be purchased here.
- Your machine features an e-plus dial which may be blocked. Try brewing a shot and while the pump is activated turn the e-plus dial back and forth. This may clear up the blockage and restore flow.
- The dispensing spout may be blocked. Try very gently cleaning the dispensing spout holes with a toothpick to remove any blockages.
Have Flow But Getting No Flow Error
In some situations, you will be able to get flow through the machine for all functions, but the machine thinks there is no water flowing through. There is a device in the machine called a flow meter, and it tells the machine when water is flowing through or not. The device operates by having small fan-like blades spin when water passes through it. If those blades get stuck from excessive scale buildup or debris, then they will not spin. As a result, even though water is flowing through the machine, you will get a flow error.
If your machine uses a water filter, temporarily remove it from the water tank and add the recommended descaling product to the water tank. The descaler needs to work its way into the system to start dissolving the scale buildup in the flow meter. You may have to keep restarting the machine so that it can keep attempting to prime, which will draw the descaler/water solution into the system. If at any point you are able to clear the flow message then you will want to do an immediate descale of the machine. After you have descaled, run 4-5 tanks of plain water through the hot water function for the wand in order to ensure the system is completely free of debris.
Machine Is Leaking
From The Bottom
- Check the internal drip tray to make sure it isn't cracked or overflowing. If the drip tray is overflowing, this may be because the drip tray was removed but not emptied. Anytime the drip tray is removed from the machine while the machine is powered on, the drip tray sensor will reset to zero, tricking it into thinking it had been emptied. To prevent overflow, make sure the drip tray and grounds drawer are emptied any time they are removed from the machine.

- Older Accademias have an old style drip tray, which has rubber grommets on the back. If one of the grommets is missing, the drip tray will need to be upgraded to the new style, which can be purchased here.
- Make sure the spout is aligned properly on the front of the machine. If the dispensing spout is improperly positioned, the machine will leak from the bottom of the door, because water/coffee will be forced into the inside of the door. This can cause damage to electronics that are contained within the door, and will also result in leaking from the bottom. The dispensing spout should be flush with the very front of the square arm that it slides onto.
- Open the front door of the machine and check the back side of it. There should be a tube sticking out of the door about midway down. This tube mates with the injector nozzle from the brew unit. If this tube is damaged or missing coffee will spray on the back of the door, which can possibly result in fully brewed coffee leaking from the bottom front of the machine.
- The leaking is coming from the water tank chamber.
- If the water tank is not positioned properly it can cause water to continuously drain from the tank, even while the machine is turned off. This happens when the water tank is inserted far enough to open the release valve, but not far enough to seal with the intake line. Excess water in the water tank chamber is redirected to the internal drip tray through a separate drain hole. When this happens, the internal drip tray will fill and overflow with clear water. Make sure there isn't any debris which could be blocking the tank from seating properly. Then firmly reinsert the tank into the machine, and press down on it to make sure it creates a good seal.
- If the machine is leaking from the back left, especially when one of the functions is drawing water through the system, then the intake line is damaged or disconnected. This will require a repair.
From The Wand
If the steam wand is leaking while the machine is on and/or brewing, the steam valve is open inside the machine. It is likely that scale has built up inside the valve, and the buildup is holding the valve open. Try the following to resolve the leak:
- First begin by descaling the machine using the recommended descaling product.
- After descaling flush 4-5 tanks of plain water through the system using the hot water function for the steam wand. This will ensure any debris or scale buildup the descaling loosened is fully removed.
- If this does not work then the machine should be sent in for repair since the steam valve may need to be replaced.
From Dispensing Spout

If coffee is leaking around the spout assembly, or from the front of it, then it is not properly positioned on the machine. The spout assembly is designed to be removed for cleaning and to make room for larger beverage containers. When the spout is aligned incorrectly it is going to cause coffee to flow through the machine incorrectly. It can cause coffee to leak around the spout, or even leak from the bottom of the front door, because the coffee is being redirected incorrectly.

Here is what the machine looks like when the spout is removed. The spout is not a necessary component; when it is removed the machine will brew a single stream instead of a split stream.

Here is what the spout looks like when it is pushed too far back. The spout can also be pulled too far forward. This is what causes the spout to leak.

The spout should be positioned this way. It should be completely flush with the matching shape of the upper screen assembly. The beveled edges should be aligned, and the rectangular protrusion the e-plus dial attached too should be flush with the spout as well.
Machine Not Heating Or Powering On
No Power
- Make sure the machine is plugged into an appropriate power source.
- Do not use the machine on a surge protector. This machine has a high power draw, more than a typical kitchen appliance such as a refrigerator or a microwave. Surge protectors are typically not rated to handle the amperage this machine requires.
- Make sure the power cord is firmly inserted into the power socket on the machine.
- Try using the machine on a different outlet, and make sure the machine is the only appliance plugged into that outlet.
- Try testing another appliance on the same outlet.
- Make sure the power switches are functioning properly and not broken. If the machine isn't powering on try pressing and holding the power button in the on position to see if the machine turns on. If you are able to power the machine on this way then the power switch needs to be replaced.
- If the machine recently had a leak, had water spilled on it, or any other exposure to moisture then the machine may be shorting out. Try letting the machine sit unplugged for 48 hours to make sure there isn't a short caused by moisture.
Stuck In Standby Mode
If the machine does not come out of standby mode after pushing the button or if it turns itself off the machine will need to come in for service. Make sure to press on the power button firmly when attempting to bring the machine out of standby. It may be worth trying to let the machine dry out for 48 hours with the front door open, in case the machine was exposed to moisture.
Cold Shots or E14 Error
- If the machine is producing shots that are hot, but you would like them to be hotter, check the beverage programming menu. Make sure all of the drinks are set to brew at the highest temperature.
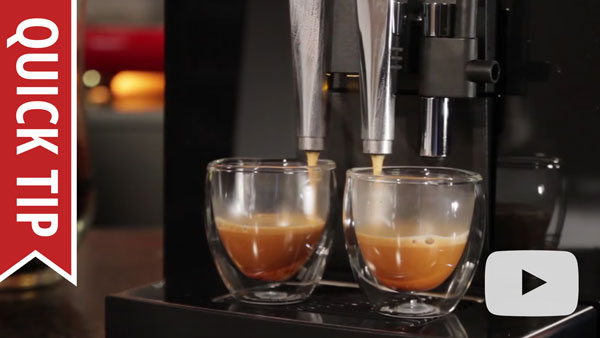
- Make sure you are using a preheated cup. Ceramic cups will sap a lot of heat from the shot resulting in a colder shot. Preheating the cups using the machine's hot water function will allow the cup a great deal more heat. Alternatively, you can brew into a paper, styrofoam, or other well insulated cup. This video explains the importance of a pre-heated cup during espresso brewing:
- If the shots are completely cold, or the machine is displaying an E14 error code, then there is a thermostat issue. Try restarting the machine to resolve the issue. If the error code continues to appear, then the thermostat is damaged and the machine will need to be repaired.
Brew Temperature Comparison: Pre-heated vs. Room Temp Espresso Cups
No Beans, Grinder Blocked, Or E01
All three of these issues share the same root cause. The grinder has become jammed with grounds or coffee residues. These issues are typically a result of incorrect beans being used in the machine. This machine is not compatible with oily, dark roasted, caramelized, or flavored beans. Use of these beans can cause permanent damage to the machine that is not covered under warranty. These beans can be identified easily. They will be shiny and feel slippery or sticky. Dry beans that are appropriate for the machine will look dull and feel rough. This machine does not have a user serviceable grinder so it is very important that the correct beans are used. Follow these steps to fix the behavior:
- Remove all of the beans and set them aside.
- Move the grinder adjustment dial all the way to the coarsest setting.
- Use a vacuum to thoroughly clean out the grinder. In particular vacuum down in the chute where the beans feed into the inside of the machine.
- Clean out the dosing chute using the following instructions: here.
- Add beans back into the machine. The beans must be dry beans. Do not add incompatible beans back into the unit. Make sure the grinder is still set to the coarsest setting.
- Test the machine to see if it can successfully brew a shot. If it successfully brews, run 2-3 more shots on this grind setting so that we can be sure the system is free of the old coffee grounds.
- Once the machine is functional on this setting you can begin adjusting the grind to your preferred setting. Make small, one-tick-at-a-time adjustments, and be sure to brew shots in between. This will prevent the machine from jamming again.

Continuous Empty Grounds Error
If the “empty grounds drawer” or “empty drip tray” message will not clear, then one of the drip tray sensors may be malfunctioning. This can happen if the spout on the front of the machine is improperly positioned, causing brewed coffee to spray inside the door where several electronic sensors are located. If these sensors get wet, they can temporarily short out, or they may be permanently damaged and require repair. Follow the steps below to resolve the issue.
- First, you should review your spout alignment.
- Make sure that you are emptying the grounds drawer/drip tray while the machine is turned on and out of standby. The machine will not reset the counters for these sensors unless it is powered on. Once removed, wait fifteen seconds or so before reinserting.
- Remove the spout completely from the machine. It will pull straight forward for removal.
- Unplug the machine.
- Open the front door and prop it open. Leave the machine like this for at least 48 hours. If the sensor is wet but still operational, it needs time to dry out before the machine will function again. A small fan blowing on the back of the door will assist in drying the unit out.
- Reassemble the machine. Ensure that the brewing spout is perfectly aligned. Alternatively, it can be left off the machine and coffee will come out in a single stream instead.
- If the machine it still displaying the error message try emptying the grounds drawer and drip tray while the machine is on. If the message still does not clear after doing this then the drip tray sensor is damaged and the machine will require a repair.
Brew Unit Max Pressure, Stuck, or E03 or E04 Error Codes
The machine is sensing that the brew unit motor is working too hard to engage the brew unit. This is a fail-safe built into the machine to prevent itself from damaging the brew unit; the machine will stop working and display an error. This issue is typically resolved through normal maintenance.
- First restart the machine to clear the error message and reset the brew unit back to the home position so that it can be removed. If the machine is in an active rinse cycle do not try to remove the brew unit. The rinse cycle must be completed before the brew unit can be removed.
- Try running a blank bypass shot. To do this just run a normal bypass shot but do not add any coffee. You should just have plain water come out of the spouts. If the machine successfully completes this cycle then we know it's a coffee issue. Refer to the section of this article that discusses grinding issues.
- If this happened when you were using the bypass function specifically, then you may have added too much pre-ground coffee. The machine only accepts about a maximum of 8-9 grams per shot. The scoop that comes with the machine doses more than this. To make sure you are adding the appropriate amount take one level scoop of pre-ground coffee and remove a large pinch from it. This should about about 8 grams of coffee and should work in the machine.
How to Remove Stuck Brew Group
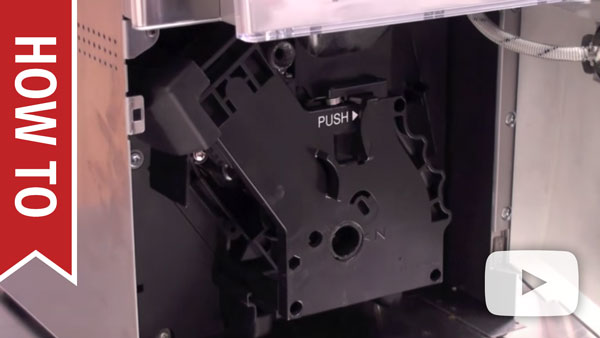
- When the machine indicates that it is ready for use open the door to the brew unit chamber.
- Try removing the brew unit. If the brew unit does not come out easily, do not force it out. The brew unit is stuck in an engaged position and will need to be properly reset. Forcing it out of the machine can break the brew unit and possibly cause damage other parts of the machine. Follow the instructions in the video below to reset the brew unit before moving on to the next step. If the brew unit won't reset to the home position, the motor that manipulates the brew unit may be damaged, and the machine may require a repair.
- If the brew unit is easily removed then rinse it off with cold water and let it dry.
- The brew unit will need to be cleaned and lubricated.
- Reinsert the brew unit into the machine and try brewing a shot.
Too Much Steam/Milk Boiling
If you think your wand is producing too much steam, or your milk looks like it is boiling, then you may need to make an adjustment to your frothing technique. Boiling milk, or milk that is getting to hot before frothing is completed is an indication that incorrect frothing technique is being used. Review the section of this article that addresses frothing difficulties for more information.
If you have tried adjusting your technique and the wand still appears to be producing too much steam, then a steam test should be completed.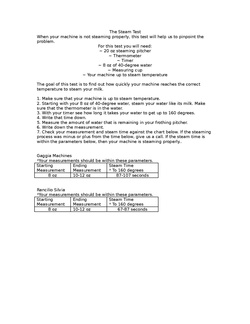
If the machine is within the specified steam test range, then the machine is producing the correct amount of steam and an adjustment to frothing technique is necessary. Using a carafe that is chilled in a freezer before frothing is helpful for keeping the milk cooler for longer, allowing for more time to froth before the milk begins to scald.
Diagrams & Manuals
| Gaggia Accademia | |
|---|---|
| Accademia Error Codes and Troubleshooting: | 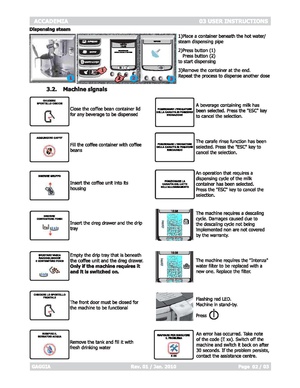
|
| Electrical Diagram: | 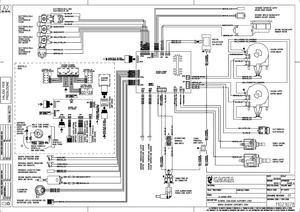
|
| Hydraulic Diagram: | 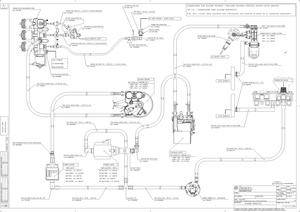
|
| Machine Manual: | 
|
| Parts Diagram: | 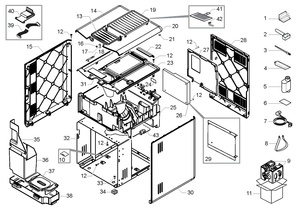
|
| Service Manual | 
|
| Startup Guide: | 
|
Specifications
| Basic Specs | |
|---|---|
| Width: | 11 in. |
| Height: | 15.2 in. |
| Depth: | 16.8 in. |
| Weight: | 43 lbs. |
| Watts: | 1500 |
| Volts: | 120 |
| Housing | |
| Housing Material: | Stainless Steel/Plastic |
| Bean Hopper Material: | Plastic |
| Drip Tray Material: | Plastic |
| Drip Tray Cover Material: | Stainless Steel |
| Drip Tray Capacity: | 10 oz. |
| Ground Coffee Container Material: | Plastic |
| Drain Line Adaptable: | No |
| Spend Coffee Capacity: | 15 |
| Easy To Rotate: | No |
| Tall Legs: | No |
| Power Cord Length: | 36 in. |
| Cup Height | |
| Adjustable Height: | Yes |
| Max Height: | 6.5 in. |
| Min Height: | 3 in. |
| One Touch Cappuccino | |
| One Touch Cappuccino: | Yes |
| One Touch Device: | Milk Carafe |
| Adjustable Froth Quality: | Yes |
| Height: | 5.5 in. |
| Separate Manual Steam Wand: | Yes |
| Programmable: | Yes |
| Milk Carafe Type: | Plastic Attachable |
| Self-Cleaning: | Yes |
| Dishwasher Safe: | No |
| Frothing Wand | |
| Material: | Plastic |
| Wand Style: | Commercial Style |
| Movement: | Privot Side To Side |
| Usable Length: | 2.5 in. |
| Height Off Counter: | 5 in. |
| Optional Cappuccinatore: | No |
| Number Of Holes: | 1 |
| No Burn Wand: | Yes |
| Optional Tips Or Wands: | No |
| Water Source | |
| Reservoir or Plumbed: | Reservoir |
| Reservoir Capacity: | 54 oz. |
| Reservoir Material: | Plastic |
| Reservoir Access: | Top |
| Reservoir Removable: | Yes |
| Water Filter: | Mavea Intenza |
| Water Level Visible: | No |
| Controls | |
| Adjustable Coffee Strength: | Yes |
| Type of Controls: | Push Button |
| Display Type: | LCD |
| Programmable Brewing: | Yes |
| Temperature Control: | Yes |
| Adjustable Coffee Dosage: | Yes |
| Digital Display: | Yes |
| Clock/Timer: | Yes |
| Coffee Dosage Quantity: | 7-10.5 grams |
| Cup Volume Control: | Yes |
| Flow Control: | Yes |
| Auto Shut Off: | Yes |
| Bypass Doser: | Yes |
| Pre-Infusion: | Yes |
| Low Water Warning: | Yes |
| Energy Saving Mode: | Yes |
| Descale Warning: | Yes |
| Multiple Programmability: | Yes |
| Pressure Gauges: | No |
| Brew Temp Display: | No |
| Cup Warmer | |
| Material: | Stainless Steel |
| Size: | 4 in. x 6 in. |
| Type: | Active |
| Brew Group | |
| Material: | Plastic |
| Type: | Automatic |
| Preheat: | No |
| Removable: | Yes |
| Self-Cleaning: | Yes |
| Boiler Data | |
| Number Of Boilers: | 2 |
| Brew And Steam Simultaneously: | No |
| Rapid Steam: | Yes |
| Brew Boiler Data | |
| Type: | Thermoblock |
| Wattage: | 1400 |
| Volume: | Low |
| Material: | Stainless Steel Lined Aluminum |
| Element Location: | External |
| Insulated: | No |
| Steam Boiler Data | |
| Type: | Thermoblock |
| Wattage: | 1400 |
| Volume: | Low |
| Material: | Stainless Steel Lined Aluminum |
| Element Location: | External |
| Insulated: | No |
| Pump Data | |
| Type: | Vibration |
| Max Pressure: | 15 Bar |
| Self-Priming: | Yes |
| Grinder Data | |
| Number Of Grind Settings: | 8 |
| Hopper Capacity: | 12 oz. |
| Burr Type: | Flat |
| Burr Material: | Ceramic |
| Freshness Lid: | Yes |
| Performance: | |
| Initial Heat Up: | 72 s. |
| Recommended Heat Up: | 72 s. |
| Brew Temp (2 oz.): | 167 F° |
| Brew Time (2 oz.): | 18 s. |
| Brew Temp (8 oz.): | 167 F° |
| Brew Time (8 oz.): | 57 s. |
| Time To Produce Steam: | 15 s. |
| Time To Steam Milk (8 oz.): | 81 s. |
| Maximum Effective Froth Duration: | 120 s. |
| Hot Water Temp (8 oz.): | 165 F° |
| Hot Water Time (8 oz.): | 53 s. |
| Hot Water Recovery Time: | 0 s. |
| Sound Level Brewing: | 66 Db |
| Sound Level Grinding: | 70 Db |
| Details | |
| Maintenance Alerts: | Yes |
| Country of Manufacture: | Italy |
| NSF Certified: | No |
| Recommended Application: | Home/Office |