Expobar Office Pulser/troubleshooting
From Whole Latte Love Support Library


My Machine Has No Power, Pops GFCI
Make sure the water tank is full. When it runs low it will cut power to the machine. The tank is not heavy enough when near empty, to press down on the weighted microswitch.
1. Is the machine plugged in to a GFCI outlet?
- Yes.
- If you’d like to get in to the machine yourself, begin by unplugging the machine. Remove the bottom panel. This is direct access to the heating element. There will be two plastic connectors with two wires attached to the prongs of the heating element. Remove these and let them dangle, not touching anything else. Turn the machine back on. If it keeps power, and doesn’t blow out a GFCI, then the heating element is bad and needs to be replaced.
- Try testing another appliance on the same outlet. Does this appliance have power?
- Yes. Electrical testing will need to be done to check the power cord of the espresso machine. Recommend repair or professional.
- No. The problem is your outlet.
Not Steaming and no Hot Water at all
Confirm that water is coming through the group head when the brew switch is flipped over. (You can still get water out of the group head without the boiler being full.We should be making sure the autofill function has successfully filled the boiler. Easiest way, remove the probe from the autofill and let it run for a few seconds, watching the level in the tank and see if it starts to drop. Put probe back on . Do not run this for too long or you will over fill the boiler and water will pour from the safety.
1. Is the red light coming on on the front of the machine?
- No.
- Is the machine plugged in and the power switch on?
- Yes. Move on to the next question
- No. Plug the machine in and turn the power switch on
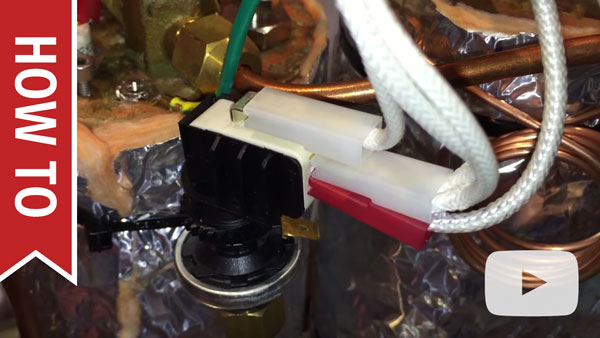
- Visually inspect the high limit switch.
- Is it melted or broken? Replace it. High Limit Replacement instructions with photos
- If it is not broken, unplug the machine, and reset it. High Limit Replacement instructions with photos
- Power the machine on see if it heats
- Test the high limit switch for continuity.
- Does it have continuity?
- Yes. Move on to the next question.
- No. Replace the high limit switch.
How To Test Electronic Systems in Expobar Brewtus PID Espresso Machines
- Is the solenoid valve (also called the auto fill valve) clicking, but not filling the boiler?
- Clean the autofill valve.

- Test voltage out of control board to the pressurestat. Is there voltage?
- No: Replace the board
- Yes. Is there voltage coming OUT of the pressurestat to the heating element?
- No. replace Pressurestat.
Replacing the Pressurestat on Your Expobar
- Yes.
- Power down the machine and unplug it. Remove the access panel on the bottom of the machine. Remove the electrical leads to the heating element. Test the heating element for continuity.
- Is there continuity?
- Test voltage out of control board to the pressurestat. Is there voltage?
- No: Replace the board
- Yes. Is there voltage coming OUT of the pressurestat to the heating element?
- No. replace Pressurestat.
- Yes.
- Power down the machine and unplug it. Remove the access panel on the bottom of the machine. Remove the electrical leads to the heating element. Test the heating element for continuity.
- Is there continuity?
How To Test Electronic Systems in Expobar Brewtus PID Espresso Machines
- No. Replace the heating element. It is highly suggested that if the machine has a bad heating element that the machine be sent in for repair. Replacement of this element is complex and requires an impact gun. We suggest reviewing the instructions below before purchasing an element. Also take note that a bad element can still have continuity so an element should not be dismissed if it has continuity. However in most cases when the red light is on and the machine is not heating, the element will be completely fractured and display no continuity.
There is no Water flow at all
- If the pumps runs, and no water is coming out, make sure both tubes are in the tank.
- Remove the water softener if you are using one. Old filters can get mucky and may need to be re-filtered, or may need to be replaced. Try running the machine without a filter.
- Try force priming the water line. We carry priming pumps, but a turkey baster is the most common household object that could work. Fill the turkey baster with water. Lift the brew lever on the machine, and while the pump is running, forcefully squeeze the turkey baster in to the tube. It takes about 6 pounds of pressure to break an air lock.
- Flip over the brew switch. Can you hear the pump?
- Yes. Move on to I Have No Water Flow At All From The Group
There is no water coming out when I open the water valve
Make sure that the steam valve works, and the issue has been isolated to just the hot water side of the machine.
- Remove the hot water tip. Open the hot water wand. Does water come out?
- Yes. Remove the tip from the hot water tap and test the flow. If flow is restored then the tip needs to be cleaned and reattached. Mineral deposits can easily collect in the screen/holes of the hot water tap, so be sure to clean these thoroughly. Soaking the tip in a solution of hot water and backflushing powder will help remove residues more effectively.
- No. There may be a blockage in the wand of the hot water tap. Clean the wand by using a pipe brush that has synthetic or plastic bristles; metal bristles can damage the wand. Then soak the wand in a solution of hot water and backflushing powder for ten minutes.
- The end of the wand that meets up with the valve is a ball joint. This has a tiny little hole in the very center. Make sure this is not clogged.
- No. Allow machine to cool, remove the housing, remove the copper pipe off the back of the hot water valve and check for a blockage if no blockage is present in the valve or the end of the pipe, a blockage is present on the boiler side. Should be sent in for repair/descale of hydraulic system.
How to Diagnose Hot Water and Steam System Obstructions
How to Remove, Clean and Lubricate Your Steam and Hot Water Valves
Removing, cleaning and lubricating your valves can be a quick fix for a leaky or sticky valve, and is good for keeping them up and working properly. You will be required to remove the housing from your machine. Watch this video to learn how to rebuild the steam and hot water taps (valves) of the Expobar Brewtus and Lever espresso machines.
DISCLAIMER: Do NOT use any chemical cleaning products. This can strip the chrome plating from the valve. Soap and hot water will be sufficient for cleaning the valve.
Once you’ve sufficiently cleaned and lubricated the valve, you can reassemble to finish the process.
How to Rebuild Steam & Hot Water Taps: Expobar Brewtus & Lever
There is no steam coming out when I open the steam knob
How to Diagnose Hot Water and Steam System Obstructions
I Have No Water Flow At All From The Group
1. Are you using a water softener?
- Yes. Remove it so you can test water flow without it.
- Make sure it is not floating and sucking in air.
- If old, replace it.
- Flip over the brew switch. Can you hear the sound of the pump?
- YES.
- Open the hot water valve. Does the pump refill the boiler?
- YES.
- Remove the nut at the top of the group head and check the valve. There is a short teflon tube, and a long teflon tube that piece together. Remove them, and make sure they are not blocked. Try running water through them, or soaking them in descaler.
- While you have this out, check and see if water is sitting in the group head. This would indicate that water is at least making it out of the brew boiler and in to the group head.
- Remove the shower screen. Hold it up to a light, and see if all of the holes are clear. Soak the screen in cafiza, or purchase a new screen and replace it.
- With the screen removed, remove the jet breaker behind it. This will be flat and can be removed with a flathead, or it will have a bolt and will require a 19mm wrench to remove. This should be inspected for any build up that will block it off.
- No.
- Make sure that the machine has power, and that the light is coming on on the power switch.
- Test voltage out of control board to the pump. Is there voltage?
- Yes. Replace the pump
- No. Replace the board
- No. Replace the microswitch.
How To Test Electronic Systems in Expobar Brewtus PID Espresso Machines
Steam Pressure is Low
- Has the machine had about half an hour or so to fully come to heat?
- Yes. Move on to the next question.
- No. Leave the machine on for a full half hour to let it come to temp.
- Try adjusting the pressurestat.
- Did the machine rise in pressure, and hold steady?
- No. Replace the pressurestat
- Remove steam tip, hold up to the light and inspect for partial blockage from debris, old milk etc. Clean if necessary.
How To Adjust the Pressurestat on Expobar Espresso Machines
My brew pressure is low
- Try backflushing the group head. If there is coffee or scale debris, it could reduce the water flow.
- Try running a test of the vibration pump, and adjusting the OPV: Pump Pressure Check and Adjust NOTE: The Pulser does not have a brew pressure gauge, so you will need a portafilter with a pressure gauge attachment to perform this test.
- If the pump pressure is low, you may want to consider replacing the pump, OPV and deairator as a catch all.
How To Check and Adjust Pump Pressure on Expobar Espresso Machine
My group head won't flush when I flip the brew switch off
Remove the black rubber tube on the bottom of the group head. Unscrew the bolt that is holding on the black cube. Remove the black cube. Underneath this, is the main valve in the solenoid valve. Remove the 4 bolts at it’s base, removing it from the group head. Spray it out with an air compressor, or let is soak in Urnex Dezcal or descaler for 20 minutes. Be careful not to lose the two o rings on its underside. When putting the solenoid valve back on after cleaning, make sure the holes line up, not just where the bolts go, but where water flows. It is very possible to put this on backwards.
Check that the wiring to the valve is connected tight.
The Pump Runs Continuously when Machine is Turned On
- This means that the steam boiler is not filling. The pump will run for about a minute and then turn off. To reset it the board you will have to turn off the machine and then turn it back on. If it times out again there is a problem with the water flow.
- If the water leaks out of the top of the boiler then the water sensing circuit is not working properly. It could be:
- Water sensor wire came of the sensor or the board.
- Using mineral free water. Sensors need minerals to operate.
- Advanced Technicians Only:
- Remove the wire off the fill probe and ground it out. Does the pump turn off:
- Yes, Raise the brew lever and see if water comes out of the brew group. If it does we know the pump and water circuit is working fine. The problem is probably in the steam boiler fill solenoid valve. It may be blocked or stuck.
- No: check the wire leading to the probe and make sure it is on the board and has continuity. If the wire is fine it may be the board.
- If the autofill turns on after removing the wire from the probe, the boiler may already be full.
- Move on to “My steam boiler is not heating”
- In very rare cases, an older machine with bad water and terrible maintenance will build scale up on the probe in the boiler, scale is a poor conductor and can cause issues with the autofill circuit functioning properly. Also make sure the connector is tight on the water level probe, if its too loose, use a pair of pliers to tighten the connector more. You can remove the water level probe and check it for scale. If scale is present you can use fine grit sandpaper to remove it.
My machine is leaking
1. Is coffee coming up and over the portafilter?
- Replace the group gasket. Group Gasket Replacement
- Should I use the 8 mm gasket?
- Older machines would take the 8 mm group gasket, and continue taking the gasket throughout it’s life.
- Should I use the 8.5 mm gasket?
- Newer machines of any model Expobar will use an 8.5 mm gasket. If it does not seem to fit, there is a possible obstructions, coffee, etc, preventing it from sitting all the way in to the group head. Try a thorough cleaning if the 8.5 mm doesn’t seem to fit.
2. Is it steaming from above the machine through the vents on top?
- Take apart the vacuum breaker and inspect the components, clean all components and remove any buildup or small pieces of debris. Make sure the small o-ring is not broken or too dried out.
- If cleaning it does not resolve the steam leak, replace the vacuum relief valve.
- Is steam pressure too high? Safety valve will vent when steam pressure exceeds a certain point. Try turning down pressurestat. If this doesn’t work, replace pressurestat. NOTE: There is no steam pressure gauge on this machine, but if steam is venting from the safety valve, the steam pressure is likely too high.
- If the safety is still leaking, replace the safety valve. Do not take it apart and clean it. Safety valves contain a teflon diaphragm. On older machines, debris and buildup can form here, this will allow steam to escape when steam pressure is built.
How To Clean or Replace the Vacuum Relief Valve on Expobar Espresso Machines
- NOTE: Under no circumstance do we recommend you remove the copper plug and open the safety valve. This could result in incorrectly adjusting the safety, which will then prevent it from blowing off excess steam like it should. The safety should just be replaced.
3. Is the leak coming from the valve behind the group head?
- Try running a backflush to see if there is debris stuck and preventing it from sealing closed.
- Remove the black rubber tube on the bottom of the group head. Unscrew the bolt that is holding on the black cube. Remove the black cube. Underneath this, is the main valve in the solenoid valve. Remove the 4 bolts at it’s base, removing it from the group head. Spray it out with an air compressor, or let is soak in Urnex Dezcal or descaler for 20 minutes. Be careful not to lose the two o rings on its underside. When putting the solenoid valve back on after cleaning, make sure the holes line up, not just where the bolts go, but where water flows. It is very possible to put this on backwards.
4. Is it dripping or leaking out of the tip of the steam wand?
- Yes. It should leak or drip a little bit after use, and when the machine is first started up. This is normal, and due to condensation in the pipe. It should subside after a few minutes of non use.
5. Is the leak coming from between the steam tip and the wand?
- There is a rubber o ring or teflon gasket in between them that may need to be replaced.
6. Is the leak coming from the safety valve?
- What kind of water are you using?
- If you are using distilled water, or reverse osmosis, there will not be enough mineral content in the water for the water level probe to send a ground signal, telling the pump to shut off.
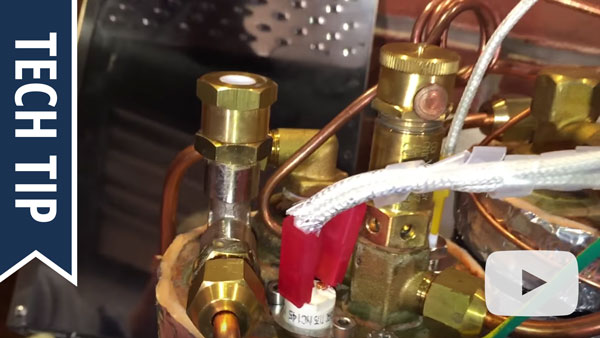
- If pump is still running and water comes out of the safety valve, check that the connector did not come off of the level probe, if it did, reconnect.
- Make sure that the green and yellow ground wire did not come loose from the control board. This usually results in the safety valve spraying like a sprinkler, not just a “leak”.
- Make sure that the wire coming from the autofill going to the board, right next to the ground wire, did not come loose.
- If the safety is still leaking, replace the safety valve. Do not take it apart and clean it. Safety valves contain a teflon diaphragm. On older machines, debris and buildup can form here, this will allow steam to escape when steam pressure is built.
- NOTE: Under no circumstance do we recommend you remove the copper plug and open the safety valve. This could result in incorrectly adjusting the safety, which will then prevent it from blowing off excess steam like it should. The safety should just be replaced.
7. Is the leak coming from the boiler itself?
- Is it leaking from where a valve screws in to the boiler?
- Remove the valve, and clean any remnants of sealant. You can use teflon tape, Permabond, or locktite to reseal the valve back into the boiler.
- Is the leak coming from a weld point on the boiler?
- The boiler must be replaced.
8. I cannot find the source of the leak.
- Run the machine to allow it to heat. Some leaks may only be apparent under heat and pressure.
- You can open the machine and send us any photos or videos, so we can determine if we can find the source of the leak.
- Send the machine in for service.
Portafilter is too tight on brand new machine
As long as water is not leaking around the portafilter from the group head, this is totally normal. Over time, the portafilter will wear in to a normal 6 o’clock position. It could take about a month or two. As long as it is making a good seal, then it is fine. In another year or so, the gasket will need to be replaced again, and may still be a little off center in the beginning.
My coffee tastes bitter or sour
Typically, issues with crema or the flavor of the shot do not indicate a malfunction of the machine. Instead, this indicates that an adjustment needs to be made in the brewing process or that different beans need to be used.
- Here is some helpful advice on Tamping: Tamping Tips
- Making adjustments to the grind is going to have the biggest impact on the coffee extraction. If it is too coarse, the coffee is going to come through too fast, and not extract long enough. How to Grind For Espresso
- If the grind is too fine, it is going to extract for too long, results in really bitter shots. How to Grind For Espresso
- It is important to use fresh beans, typically beans roasted within the past two weeks are best. Light and medium roasts are best for espresso brewing and richer crema.