Rancilio Silvia/troubleshooting
From Whole Latte Love Support Library


No Crema or Bad Tasting Shots

Typically, issues with crema or the flavor of the shot do not indicate a malfunction of the machine. Instead, this indicates that an adjustment needs to be made in the brewing process or that different beans need to be used.
The following articles review the different variables and offer solutions:
- Tamping The Correct Way and The Effects Of Tamping Pressure
- Grinding Coffee For Espresso
- It is important to use fresh beans, typically beans roasted within the past two weeks are best. Light and medium roasts are best for espresso brewing and richer crema. Storing beans properly is also important, more information can be found here.
If the behavior persists after reviewing these factors then the machine may need to be cleaned. Lack of cleaning can cause burned or bitter flavors, or create flow issues which can result in a weak shot. Navigate to the Cleaning & Maintenance icon above for more information.
The Rancilio Silvia is particularly picky when it comes to having all of these factors perfect. New users of the machine are suggested to work on pulling and perfecting their technique by pulling double shots with the double filter basket. Single shots are notoriously hard to pull and should not be attempted until double shots can be pulled with the machine consistently. This video above discusses making this adjustments on the Silvia in particular.
Difficulty Frothing
As with brewing, technique is critical to frothing well. Frothing is very sensitive to technique, which has a steep learning curve. If the machine is producing steam then an adjustment to technique may need to be made. The video on the right shows proper frothing technique.
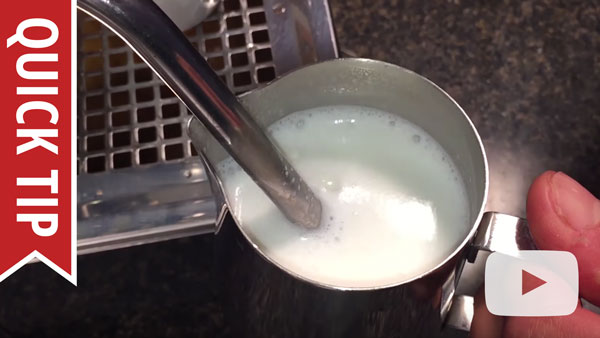
How to Froth and Steam Milk for Latte Art, Cappuccino and More
Many frothing mistakes are common missteps that result in poor or no froth. The video on the right identifies these mistakes and shows how to correct them.

6 Common Milk Frothing Mistakes
It is also important not to overheat your milk. The milk will have the sweetest and most velvety texture between 140-150 F°. As you froth past this point the milk will lose its sweetness, the froth will take on a gummier texture, and eventually the milk will scald and begin to taste burnt. The video on the right explains how to use a frothing thermometer so that the milk is kept within the ideal range.
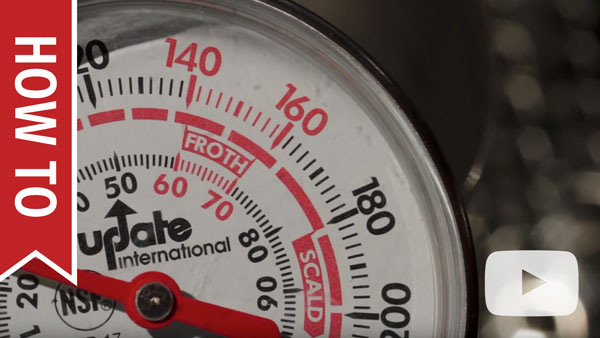
How To Use a Thermometer to Froth Milk
Flow Issues
The first place to start with any flow issue is cleaning the machine. Before going through these steps please make sure the machine is cleaned according to theCleaning & Maintenance section above.
No Steam From Wand
- Check the brew function on the machine and see if water is able to flow through the machine for this function.
- If the brew water is not flowing either refer to the No Flow At All section of this article
- If the brew water flows but is not hot refer to the On But Not Heating section of this article.
- Turn the hot water function on for the steam wand to test for flow.
- If nothing comes through refer to the Only Flow From Brew Head section of this article.
- If water does come through try setting the machine to steam mode again and testing for steam. Running the hot water function can help remove blockages in the steam wand assembly.
- Unplug the machine and remove the top to check for any loose or disconnected wires, and resecure these connections.
- If nothing else looks wrong then the steam thermostat has probably failed in will need to be replaced. Instructions for replacing the thermostat are shown in this document.
Only Flow From Steam Wand
Try these steps in the following order. Between each step test the machine for flow. If flow is restored to the machine do an immediate descale of the unit before returning to normal use.
- Test the flow of the machine without the portafilter attached. If the machine flows with the portafilter removed then one of the filter baskets is blocking the flow. Clean the baskets by soaking them in a solution of hot water and backflushing powder for 30 minutes, or boiling the baskets for 30 minutes.
- Make sure the grouphead is completely clean and free of debris. Be sure to completely disassemble the grouphead for cleaning. This is the Silvia cleaning and maintenance guide. Instructions for disassembling and cleaning the grouphead are included in this manual.
- The solenoid valve may be dirty or blocked and will need to be disassembled and cleaned. Instructions for cleaning the solenoid valve can be found in this tech document.
Only Flow From Brew Head
- Remove the tip from the steam wand and test the flow using the hot water function. If flow is restored then the tip needs to be cleaned and reattached.
- If the flow is still blocked then there may be a blockage in the steam wand itself. Clean the wand by using a pipe brush that has synthetic or plastic bristles; metal bristles can damage the wand. Then soak the wand in a solution of hot water and backflushing powder for ten minutes. Test flow again.
- The solenoid valve may be dirty or blocked and will need to be disassembled and cleaned. Instructions for cleaning the solenoid valve can be found in this tech document.
No Flow At All
If the machine is not outputting any water follow the instructions below. Once flow is restored make sure to pull a full 8 oz. of water using the hot water function to ensure the machine is correctly primed.
- Check the water tank to make sure it is filled to the max line.
- Make sure the inlet lines are in place and not blocked by anything.
- Activate the hot water function on the machine. You should hear a vibration noise coming from the machine to indicate that the pump is activated.
- If you can't hear anything coming from the machine then there may be a loose or disconnected wire inside of the machine. Unplug the machine and open up the top to inspect the inside for any loose or disconnected wires, particularly at the pump or the front switch panel. Firmly secure any loose wires and test flow again using the hot water function.
- If you hear the machine vibrating then the pump is turning on. Unplug the machine and open the top to inspect the inlet line to make sure it isn't kinked or pinched. If the hose is kinked straighten it out and then plug the machine in again to test for flow.
- The pump of the machine may be vapor locked, requiring a force prime of the unit.
- To force prime this unit take a kitchen syringe, turkey baster, or priming pump and fill it with water.
- Insert the tip of it into the inlet line of the machine.
- Activate the hot water function of the machine. When you hear the pump kick on quickly force water with your priming tool.
- Immediately turn the machine off to prevent air from being drawn into the line.
- Repeat this process multiple times. After 3-4 manual primes you should start to see water spitting from the steam wand. Once this happens you can put the inlet line back into the tank and try to prime the machine normally by pulling 8 oz. of water through the machine using the hot water function.
Machine Is Leaking
Between Portafilter & Grouphead
If the machine is leaking from between the grouphead and the portafilter then the grouphead gasket is either pushed out of place and needs to be reinserted properly, or the gasket is worn out. Typically grouphead gaskets will wear out from 6 months to a year depending on how heavily the machine is used. Premature wear to this gasket can be caused by using excessive force when attaching the portafilter, or leaving the machine on for long periods of time without use. It is important to distinguish where the leaking is occurring. If the leak is originating from farther up in the machine and coming down around the grouphead then refer to the section of this article which discusses leaking from the top of the machine instead.
If the leaking is coming from between the portafilter and grouphead where you twist the handle on, then the gasket will need to be replaced. Instructions for replacing the gasket can be found here. A replacement gasket for the V3 and M style Silvias can be purchased here. You can try using the instructions to clean and reseat the current gasket. If that does not resolve the leak then the gasket will need to be replaced.
The gasket can get stuck in the grouphead from wear or excessive heat exposure. To remove the gasket take some self-tapping screws and partially screw them into the group gasket. Make sure not to go all the way through the gasket because you can scratch/dent the grouphead if you go too far. Then use a pair of pliers to pull on the screws and the gasket will pulled out with them.
From Top Of Machine
A leak from the top (or head) of the machine typically indicates a loose connection or broken part inside the machine. If the leaking is coming from between the portafilter and the grouphead then refer to the section of this article which covers changing the group gasket. Otherwise follow these steps to identify the source of the leak. It may be necessary to run the machine with the top removed in order to identify the leak.
- Turn the machine off and unplug it.
- Open the top of the machine. Check for any loose hoses, broken hoses or hoses with pinhole leaks, or any other fittings that are leaking.
- If you find a loose hose reconnect it to the appropriate fitting.
- Hoses that are broken or have pinhole leaks will need to be replaced.
- Other loose fittings can typically be resecured by screwing the part down. Plumbers tape or a sealing compound may be necessary to provide a good seal.
- Examine the boiler assembly.
- If there is leaking coming from between the boiler and the grouphead assembly try tightening the allen screws that secure the boiler and grouphead together.
- If it continues to leak then the o-ring that seals these two assemblies has slipped out of place or is worn out and needs to be replaced. Try unscrewing the boiler and the grouphead by removing the eight allen screws mentioned in the previous steps. Clean the o-ring off and reseat it and screw the boiler assembly back into place. If this does not resolve the leak then the o-ring is worn out and needs to be replaced.
- The boiler may be cracked. If you find a crack anywhere on the boiler then the machine was exposed to subfreezing temperatures without being drained properly or the machine was dropped. The boiler will need to be replaced.
- Examine the steam wand to the right of the boiler. If this is leaking make sure the fittings are tightened down securely.
From Bottom Of Machine
- Check the water tank and drip tray to make sure that are no cracks or breaks where water can escape. Make sure they are properly positioned on the machine.
- Ensure that the return line is sitting inside the water tank. If the tube is outside of the tank, or pushed up into the machine it will cause a leak. Position it so that it is sitting inside the water tank.
- Check the pump connections to make they are secure. These instructions show how to remove the back panel in order to access the pump.
- Examine the pump to see if there are any cracks in it. If the machine was exposed to subfreezing conditions without being properly drained it can cause the pump to crack. Replace the pump if it is cracked.
- Make sure both the inlet line and the outlet line on the pump are securely connected.
From Steam Wand
- If the wand is leaking from the end of the wand it means the steam valve is not fully closed.
- Try tightening the knob down firmly. Pressure from the boiler will leak through the wand if the steam valve is not securely closed.
- If it feels like the knob is spinning in place then the knob may be broken. Try removing the knob and manually turning the steam valve closed. An adjustable wrench or a pair of pliers can help with this. If this stops the leak then the steam knob will need to be replaced.
- Descale the machine according to the instructions in the Cleaning & Maintenance section above. Scale buildup inside of the steam valve will prevent the valve from closing fully and can cause permanent damage to the valve. After the machine has been descaled run 4-6 tanks of water through the wand using the machine's hot water function to ensure any debris or scale in the valve is fully removed.
- If the leaking persists then the steam valve will need to be replaced. Instructions for the steam valve can be found here.
- If the wand is leaking from where it connects to the machine then the wand is not sealing properly to the steam valve assembly. Make sure the wand is properly secured to the steam valve assembly. The wand connects to the steam valve assembly on the inside of the machine with a hex shaped bolt. Remove the cover of the machine to access the inside. The wand connects to the steam valve assembly to the right hand side of the boiler. Use an open ended wrench or adjustable wrench to make sure the bolt is properly secured to the steam valve assembly. If tightening the wand onto the steam valve assembly does not resolve the leaking issue then there may be a worn or broken o-ring.
Machine Not Heating Or Powering On
No Power
- Make sure the machine is plugged into an appropriate power source.
- Do not use the machine on a surge protector. This machine has a high power draw, more than a typical kitchen appliance such as a refrigerator or a microwave. Surge protectors are typically not rated to handle the amperage this machine requires.
- Try using the machine on a different outlet, and make sure the machine is the only appliance plugged into that outlet.
- Try testing another appliance on the same outlet.
- Unplug the machine and inspect the power cord for any damage such as nicks in the plastic or fraying.
- Turn the power button off and unplug the machine. Remove the top of the machine. Check the machine for any other loose, disconnected, or burned wires. Check the power switch terminals in particular.
- If the machine recently had a leak, had water spilled on it, or any other exposure to moisture then the machine may be shorting out. Try letting the machine sit unplugged for 48 hours to make sure there isn't a short caused by moisture.
Brew Not Heating
- Check to make sure the machine is set to heat for the brew function.
- Give the machine sufficient time to heat up. It can take up to ten minutes for this machine to be sufficiently heated for brewing. Make sure the portafilter is attached during heating.
- Make sure the brew indicator light has come on to indicate the machine is heated.
- While the water in the boiler may have heated to the correct temperature within minutes the grouphead may still be cold. If the grouphead is still cold then the temperature of the brew water will be drastically reduced once the water exits the boiler and comes into contact with other cooler components. This is why it is important to give the machine at least ten minutes to fully heat.
- If the water coming from the brew head is completely cold then the brew thermostat may need to be replaced. Test to see if the machine can he for the steam function. If it can then the brew thermostat should be replaced. Instructions for replacing the brew thermostat can be found here
Steam Not Heating
- First make sure that there isn't any sort of flow issue by looking at the section of this article that discusses steam wand blockages.
- Make sure the machine is set to steam mode, and that the indicator light says that the machine is heated for steam.
- It is normal to have water come through the steam function for the first 5-10 seconds of steaming. This happens because the hot steam condenses back into water after it leave the boiler and come into contact with the room temperature steam valve and wand assemblies. For this reason you should do a process called purging.
- To purge the steam wand place an empty cup under the steam wand and turn the steam knob to the open position.
- Let the steam come through for 5-10 seconds, until there is significantly less water and a strong jet of steam.
- Close the knob, and begin your normal frothing process.
- If the preceding steps have not resolved the issue then the steam thermostat will need to be replaced. Instructions for replacing the steam thermostat can be found here.
On But Not Heating
- Unplug the machine and open the top. Check the machine for any loose or disconnected wires. Check the steam and brew thermostats specifically to make sure the leads to them are securely connected.
- The high limit switch of the machine may have tripped. Instructions for resetting the high limit switch can be found here.
- If the machine is still not heating then the high limit switch will need to be replaced. Instructions for replacing the high limit switch can be found here.
- This issue typically occurs because the machine is left on for an extended time without use, the machine experienced a power surge, or the boiler wasn't refilled after steaming. Home units like this should only be left on for a maximum of 45 minutes without use. The machine should be turned off if it is not going to be used within that time. Additionally since the machine does not have an auto-fill function it is important to manually refill the boiler after steaming by using the hot water function. If the boilers becomes too emptied it can trip the high limit switch or damage the heating element.
Too Much Steam/Milk Boiling
If you think your wand is producing too much steam, or your milk looks like it is boiling, then you may need to make an adjustment to your frothing technique. Boiling milk, or milk that is getting to hot before frothing is completed is an indication that incorrect frothing technique is being used. Review the section of this article that addresses frothing difficulties for more information.
If you have tried adjusting your technique and the wand still appears to be producing too much steam, then a steam test should be completed. Steam Test Instructions
If the machine is within the specified steam test range, then the machine is producing the correct amount of steam and an adjustment to frothing technique is necessary. Using a carafe that is chilled in a freezer before frothing is helpful for keeping the milk cooler for longer, allowing for more time to froth before the milk begins to scald.
Portafilter Handle Not Fitting On Machine
- On new machines the portafilter will not fit perpendicular to the machine. This is because the grouphead gasket requires time to wear in before this can happen. As long as you can get the portafilter hand tight onto the machine and brew without leaking then the machine is operating properly. Do not use excessive force when attaching the portafilter or it can damage or break the grouphead gasket.
- Too much coffee may be dosed into the portafilter. If there is too much coffee in the portafilter is can press into the shower screen and prevent the portafilter from attaching properly. Reduce the amount of coffee in the portafilter or test the machine with an empty portafilter. If the portafilter attaches properly then the filter basket was simply overdosed.
- Check the filter baskets for dings, dents, or any sort of warping. A filter basket that is malformed can prevent the portafilter from attaching. Try attaching the portafilter with the basket removed, or with a different basket to see if it fits on correctly.
- The group gasket has slipped out of place or needs replacing. Please refer to the section of this article which discusses gasket issues for instructions on how to test the gasket or replace it.
- The grouphead may be damaged. If the machine was dropped or the grouphead was struck hard, then it can damage the grouphead. The grouphead would need to be replaced. This is not a normal occurrence and only happens if the machine has been mishandled.